Capturing your gaming moments starts with knowing how to record gameplay on PC. Whether for tutorials, streaming, or epic highlights, smooth, high-quality recordings are key. This guide covers five powerful methods, from built-in tools to pro software like Tipard Screen Capture, plus tips to maintain FPS and create polished, professional videos.

Method 1: Using Built-In Windows Tools
Windows 10 and 11/Xbox Game Bar - All of this is built into the OS and is free and does not require any installation. Background recording and microphone recording are features included and are great for recording.
Step 1 Press and hold the Windows button and hit G.
Step 2 Check Mark the Capture Window if it is not active, and if it asks Yes, this is a game.
Step 3 To start recording videos, click on the Record button with the dot or press Windows+Alt+R.
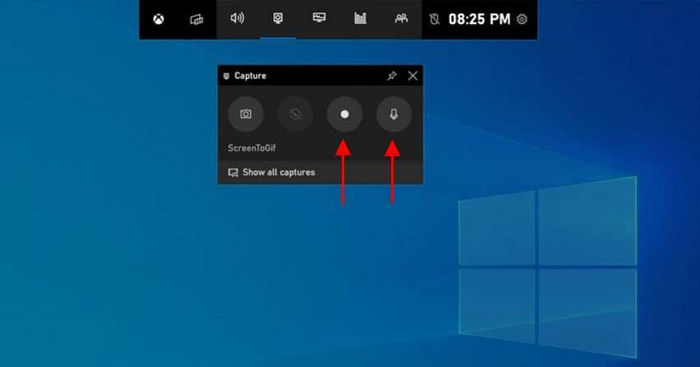
Step 4 To turn the microphone on or off, press Windows+Alt+M.
Step 5 To end the recording, click on stop or press Windows+Alt+R. The videos will end up in Videos > Captures by default.
Method 2: Using Your Graphics Card Software
If your PC is equipped with an NVIDIA or AMD Graphics card, then it would be wise to use the recording tools built into the card, as it will allow for smoother recording with minimal loss in FPS.
1. NVIDIA ShadowPlay / NVIDIA Share
Shadowplay has the ability to record videos in high quality, replay previous sections of the game and capture videos without heavy drawbacks to performance.
Step 1 Install GeForce Experience, then sign in and turn on In-Game Overlay located in Settings, then General.
Step 2 Press the Alt and Z keys at the same time in order to show the overlay.
Step 3 If you are finished recording, select Record, then click on Start, or press Alt + F9 on your keyboard.
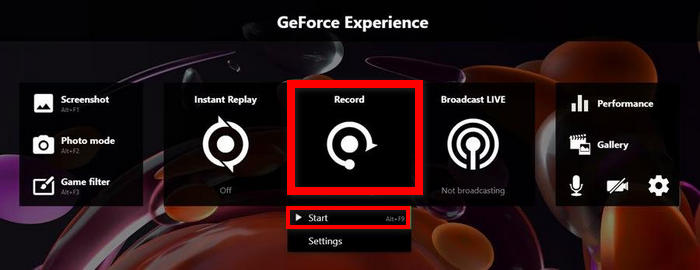
Step 4 Press Alt + F9 again if you would like to stop recording. Your recording will automatically save to your Videos folder on your computer.
2. AMD ReLive (AMD Software: Adrenalin Edition Recording)
Tool ReLive built into AMD Adrenaline Edition Software allows you to record your gaming sessions for a long period of time without apparently affecting system performance.
Step 1 If you would like to use ReLive, open AMD Software: Adrenalin Edition and then go to Settings, then General and enable Record & Stream.
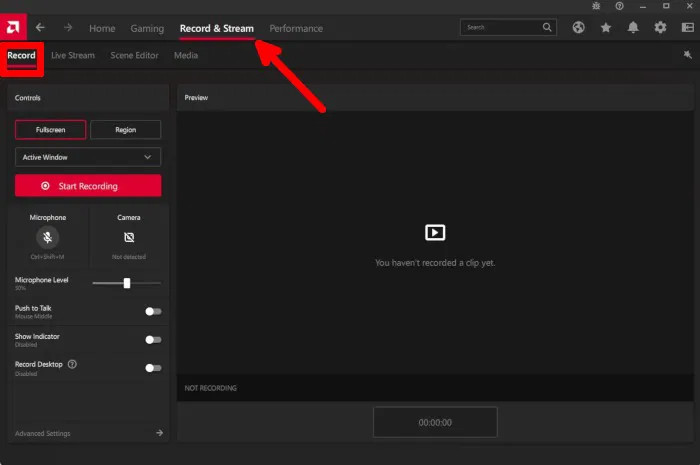
Step 2 Use the Alt + R command on your keyboard to open the overlay window.
Step 3 If you want to start recording, you click on Start Recording or press Ctrl + Shift + R on your keyboard.
Step 4 To stop the recording, press the same hotkey you used to start recording.
Method 3: Using Tipard Screen Capture
For gamers and content creators who will benefit the most from using Tipard Screen Capture, you will have even more customizability and functionality when it comes to high-quality and smooth recording for your creations compared to built-in recorders, recording system audio, microphone, webcam, mobile devices, or other formats.
- Full-screen, window, or custom-area capture for any part of your game or desktop.
- Smooth, high-quality recording with optimized performance on Windows and Mac.
- Game Recorder mode that focuses on the gameplay window for smoother results.
- Webcam and microphone capture for commentary or reaction videos.
- Real-time drawing tools and whiteboard mode for quick highlights and notes.

Step 1 Download and install
Visit the official Tipard Screen Capture page, and you have the option to download Tipard for Windows or Mac. Run the downloaded installer and launch the tool according to the instructions on your screen.
Step 2 Choose Your Recording Mode
On the main interface, select Video Recorder to record gameplay. You may also choose Game Recorder, click on the Select the Game button, and choose from the windows you want to capture.
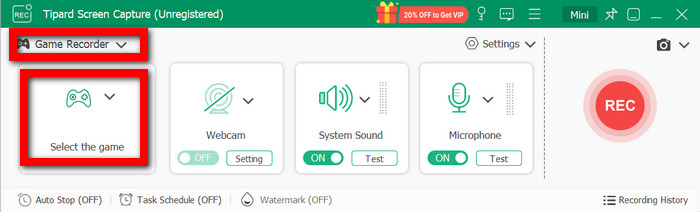
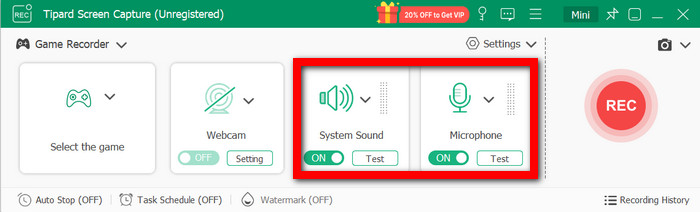
Step 3 Select Recording Area And Audio Sources
If you want to record the game audio, enable System Sound and turn the Microphone on if you want to record commentary.
Step 4 Adjust Presets and Recording Settings
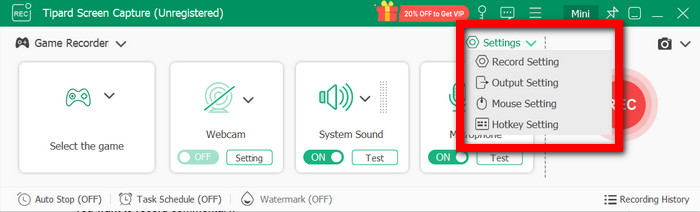
Click Settings to configure:
• Record Setting
• Output Setting
• Mouse Setting
• Hotkey Setting
Step 5 Recording Current Gameplay
Hit the REC button to start. During the recording, you have the option to draw on the screen, screen annotate, insert an image callout, or draw on a whiteboard.

Step 6 Save and Stop Recording
When you would like to stop the recording, click Stop to finish recording.
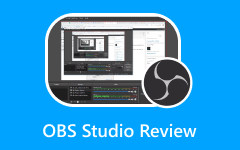
Method 4: Using OBS Studio
OBS Studio is a game and streamer-advanced game screen recorder and streamer, which is safe and free. It is useful for multi-audio source recording for advanced and high-quality capture and recording, and for inexpensive studio tools for gameplay recording.
Step 1 Download and install OBS from its official Studio Recording website.
Step 2 Run the auto-setup wizard and open OBS.
Step 3 Add a source of Game Capture or Display Capture.
Step 4 Within the audio mixer, adjust your audio settings.
Step 5 Select Settings > Output, and choose the output quality and the format for the output.
Step 6 Click Start Recording to begin.
Step 7 Click Stop Recording when done and check your output folder.
Method 5: Steam Overlay Recording
Steam now has a convenient tool that lets you record your screen without requiring any external software. It is only compatible with Steam games, utilizes hotkeys, and automatically saves your recordings. It is ideal for users who are looking for an efficient, hassle-free method to record their screen or take a screenshot Mac while they play.
Step 1 Launch Steam and activate the second toggle in the Game Recording section.
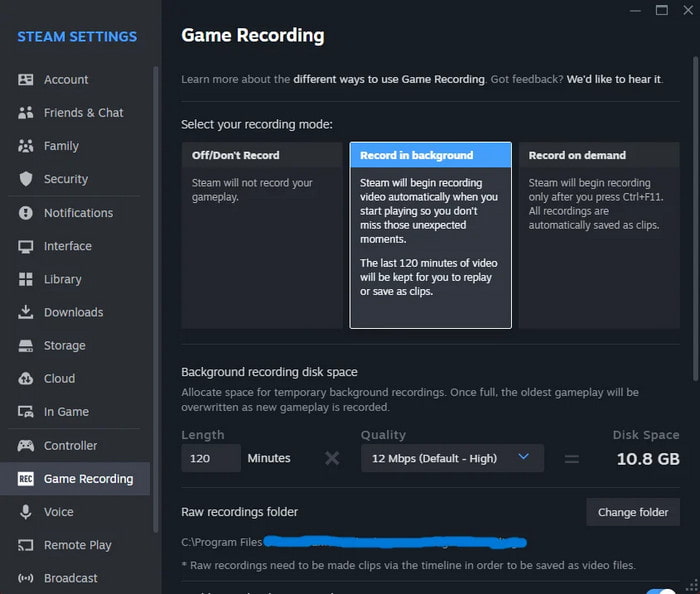
Step 2 Choose your Record on Background for screen recording.
Step 3 Run your game via Steam.
Step 4 Press the same key to end the recording.
Step 5 Check its automatically created screenshots/recordings folder for your video.
Tips to Record Gameplay Without Losing FPS
1. Choose Hardware Encoders
When selecting a hardware encoder, it is recommended that you use either NVENC (NVIDIA), AMF (AMD), or Intel Quick Sync. This is because it shifts some of the workload from the CPU to the GPU, relieving some of the pressure from the CPU.
2. Reduce Resolution or Frame Rate
The computer should record at 1080p 60fps versus 4K 120fps. If you notice that you are struggling to capture a steady frame rate, it would be wise to set the resolution to 720p, which is still a good resolution, with 60fps to reduce the workload.
3. Use a Lower Bitrate
For a 60fps video of 1080p, a good bitrate to record in would be around 20,000 - 50,000 Kbps; it is more than reasonable.
4. Record to a Separate Drive
In order to avoid read/write conflicts, it is best to save recordings on a drive that is physically separate from the drive your game is on. This allows for smooth performance capture.
5. Close Background Applications
To optimize the processing power, shut down any applications such as browsers, game store launchers, or games to play in the car, as well as any other apps that are not necessary at that moment.
Conclusion
In this post, we explored the best computer game recorder options, from built-in tools to advanced software like Tipard Screen Capture. By following these methods and tips, you can capture smooth, high-quality gameplay and create professional, shareable videos.
More Reading


About the Author