If you are looking for tips on how to improve Instagram live video quality, do not feel left out, as this is a concern for many users. Many users claim that their videos appear crisp and professional while previewing or saving them on phones. However, once the video is put up on Instagram, the video tends to become blurry, pixelated, or compressed. This adds to the question - why does a drop in quality happen, and more importantly, how do you fix it? The article states the reasons why Instagram reduces the quality of videos and how to make sure that videos are still sharp while uploaded on the platform.
Part 1. Why Is My Video Quality So Bad on Instagram
If your videos appear blurry, pixelated, or have a detrimentally reduced quality after uploading to Instagram, there are a few relevant concepts:
1. Instagram Compression
Uploading a video on Instagram will result in it being crushed regardless of its preferences. While this enables the platform to speed up content availability on various devices with differing internet speeds, it terrifically diminishes the quality of the video itself. Regardless of the clarity of the video that was compressed, it is bound to suffer damage after the compression.
2. Wrong Video Specifications
Instagram has set guidelines for resolutions, ratios, and frames. If a video fails to meet one of the outlined guidelines, the system will undertake the process of changing its proportions. The system is trying to resize or change the dimensions, which is likely to result in the video suffering a loss in quality.
3. Uploading Over a Weak Internet Connection
Uploading videos on mobile data or a slow Wi-Fi connection would mean making use of weaker internet connections. This tends to create the chance that Instagram further kills the quality of a video in an attempt to lower the chances of risk during the uploading.
4. Video File Size Is Too Large
Bigger-sized files tend to face heavy compressions being forced upon them during their uploading. On Instagram, if the file exceeds the limit set by the platform, especially for Instagram video length, an automatic reduction is bound to take place. During this time, the quality of the video is going to suffer greatly.
5. Poor Camera Settings or Editing Export Settings
Even before Instagram gets involved, the problem might start with how the video was recorded or exported. Low bitrates, the wrong resolution, or heavily filtered edits can make a video look bad once it is posted.
Part 2. How to Improve Instagram Video Quality
Tipard Video Converter Ultimate
One of the best tips for functional video editing and converting on Instagram is Tipard Video Converter Ultimate. Content creators on Instagram, for instance, can use it to shape their stories and reel footage into Instagram-ready clips without losing quality.
- Convert your videos to 4K, 5K, or 8K to keep them crisp after uploading to Instagram.
- Enhance resolution, fix shakiness, reduce noise, and change format all in one click.
- The clean layout makes video editing and converting easy, even for beginners.
- Export videos in MP4 with ideal aspect ratios for Feed, Stories, Reels, or IGTV.

To help with crisp screen glory for Instagram, these advanced steps throughout Tipard Video Converter Ultimate will help in glorying footage.
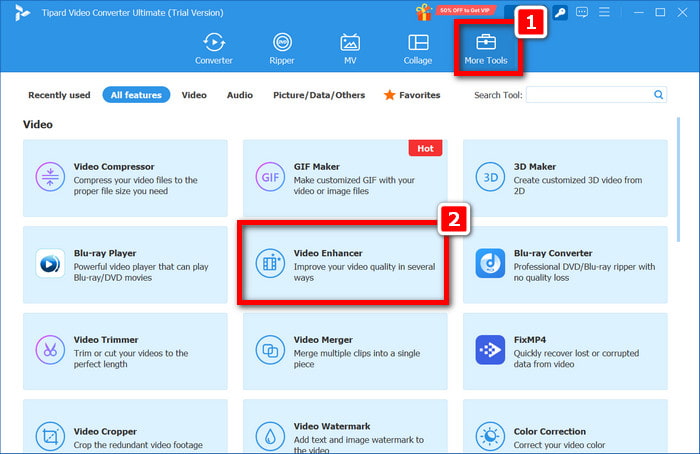
Step 1Start the Application and Upload your Video
Download and install Tipard Video Converter Ultimate on your personal computer. Then, open the tool to start the process.
Step 2Enable Video Enhancer Windows
Go to More Tools and locate the Video Enhancer option. Following that, click on the + button to add your Instagram video.
Step 3Improve Video Quality
Enable enhancement features within the enhancer options like Upscale Resolution, Optimize Brightness & Contrast, Remove Video Noise, and Reduce Video Shaking. The uptakes will ease restoration while smoothing viewing.
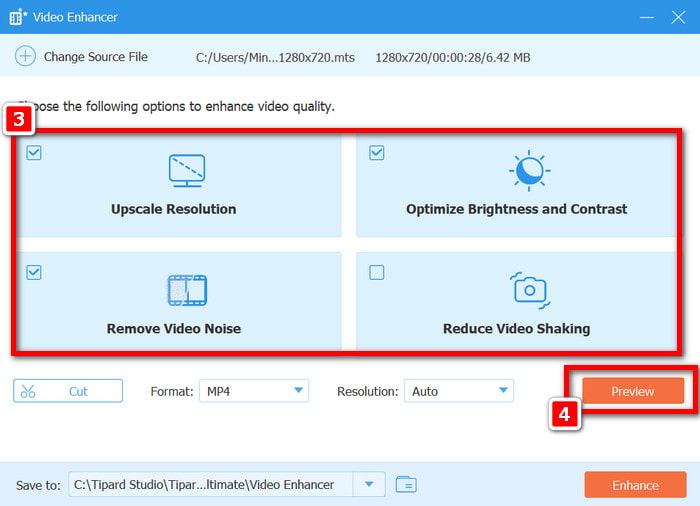
Step 4Set Format Choice and Modify Output Settings
Next, click the Preview button to review the enhanced video and make sure the improvements meet your expectations.
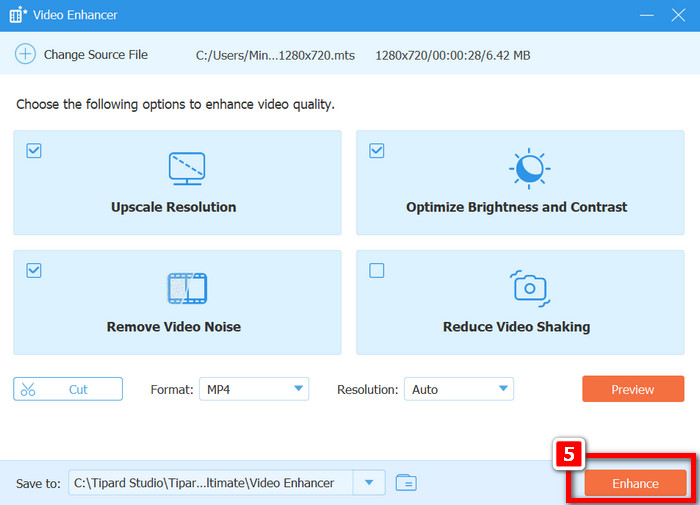
Step 5Export Enhanced Video
Once satisfied, hit the Enhance button to apply all modifications and finalize the upgrade.
Check Your Network Connection
If your internet is poor, Instagram might limit the video quality during the upload. Consult the steps below if you need to check your connection:
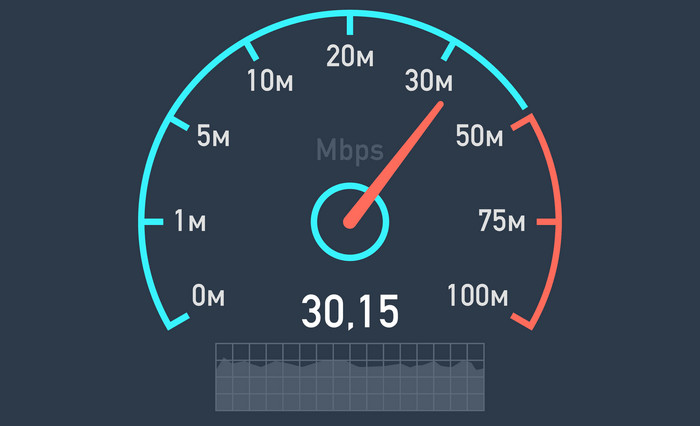
Step 1Forget your mobile data and connect to a strong Wi-Fi network for better internet access.
Step 2Run a speed test using a speed testing website, ensuring the test runs show good speeds; it is recommended to have at least 5 Mbps upload speed.
Step 3After connecting to Instagram, upload your video.
Disable Data Saver on Instagram
To reduce bandwidth usage for video uploads, Instagram has included a video quality limiting feature that needs to be disabled to allow full-quality uploads and viewing videos.
Step 1Launch the Instagram app on your mobile device.
Step 2Select Profile at the bottom right.
Step 3Click the three-line menu in the top right corner.
Step 4Select the Settings and Activity tab.
Step 5Find the usage information by scrolling down. Click on Media quality (or Cellular Data Use).
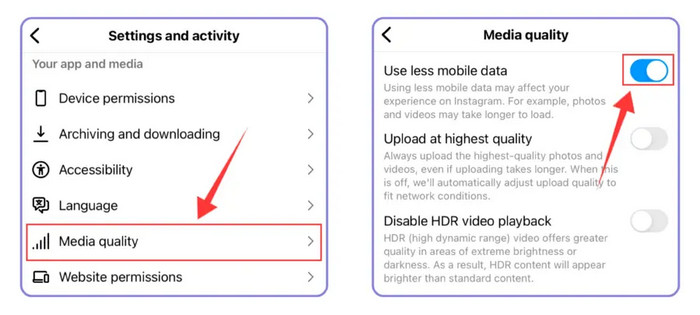
Step 6Set Use less mobile data to OFF.
Step 7Optionally, toggle High-resolution media to Wi-Fi + Mobile if you want to upload the highest quality using either connection.
Part 3. Tips to Avoid Low-Quality Instagram Videos
1. Record in High Quality
Use your camera and shoot in at least 1080p or, ideally, 4K. Higher resolution gives you more clarity, even after Instagram compresses the video.
2. Use Recommended Instagram Specs
Before uploading, make sure your video matches the ideal Instagram video format and settings to avoid quality loss and ensure the best possible playback.
| Post Type | Resolution | Aspect Ratio | Use Case |
|---|---|---|---|
| Feed (Square) | 1080 × 1080 | 1:1 | General Posts |
| Feed (Portrait) | 1080 × 1350 | 4:5 | More screen space |
| Stories / Reels | 1080 × 1920 | 9:16 | Fullscreen Videos |
| Landscape | 1080 × 608 | 16:9 | Horizontal Videos |
| Show MoreShow Less | |||
Other Ideal Specs:
| Setting | Recommended |
|---|---|
| Format | MP4 (H.264 codec) |
| Frame Rate | 30 fps |
| Bitrate | At least 5 Mbps |
| Length | 3 to 60 seconds |
| Show MoreShow Less | |
3. Use Strong Wi-Fi
Always upload using stable Wi-Fi. Weak or mobile connections increase the chance of extra compression by Instagram.
4. Avoid Using the In-App Camera of Instagram
The in-app camera may reduce video quality. Use your regular camera app for better control over resolution and exposure.
Conclusion
To improve video quality on Instagram, it is essential to use the right tools, settings, and upload techniques. Step by step, great resolutions, optimal frame rates, and bit rates, put together with Tipard Video Converter Ultimate, present a sure way to achieve ideal video quality. With the proper internet connection paired with turning off Instagram’s data saver tool, everyone can put together how to improve video quality on Instagram and keep the videos looking crystal clear even when compressed.
More Reading


About the Author