Most people enjoy sending ready-made GIFs from popular sources. But if you want to edit GIF and make them your own, you are in the right place. GIFs can be customized in many ways. You can crop, trim, cut, add filters, text, and more. With all these options, you can create unique GIFs with your personal touch.
Good thing that in this write-up, we will offer different tools with steps to help you do that. So, get ready to turn your simple GIFs into something amazing with our GIF editors!

Part 1. Easiest Way to Edit GIF on Windows/Mac
A GIF looks excellent, but something feels off. The overall look is plain or boring, the size is too big, or the text is missing. Fixing it should not be a struggle. A simple tool that makes GIF editing easy is all you need. Do you have something in mind that can do that? If you do not have any, we will introduce Tipard Video Converter Ultimate to you.
It has a built-in GIF Maker that lets you create and edit GIFs from photos and videos. It offers editing features, allowing you to add text, crop, and compress GIFs without effort. A preview button shows changes before saving. One click is all it takes; no experience is required. Amazing, right?
- See how your GIF looks before saving.
- Turn videos and photos into GIFs effortlessly.
- Customize GIFs by adding filters, cropping unwanted parts, etc.
- Convert GIF to various formats like MP4, MOV, AVI, or WMV.
- Create stunning collages and edit movies with effects and transitions.

Now that you have discovered what Tipard Video Converter Ultimate can do, let us move on how to edit a GIF using it:
Step 1Download and install Tipard Video Converter Ultimate on your Windows or Mac computer using the download buttons above.
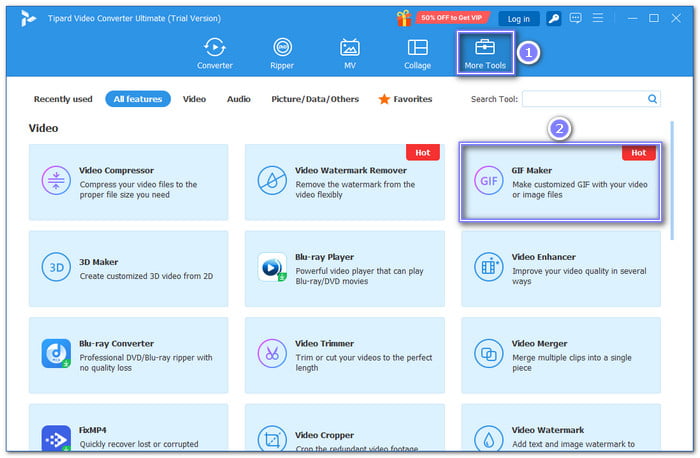
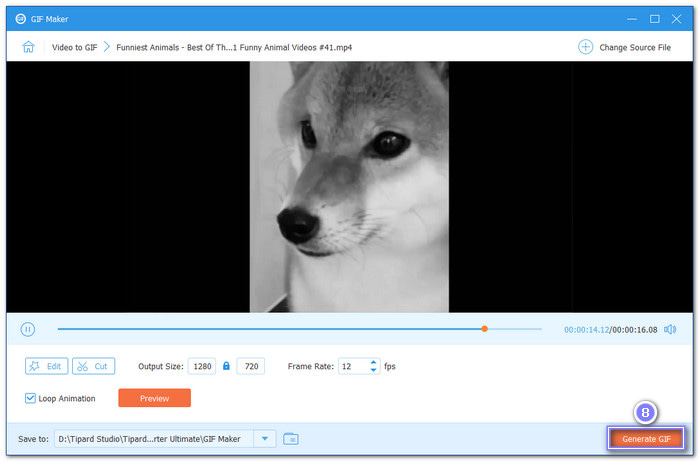
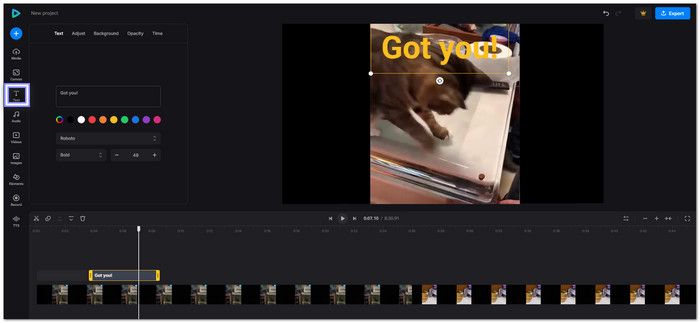
Open the program, then go to the More Tools tab on the top menu. Click on GIF Maker to enter the editing window.
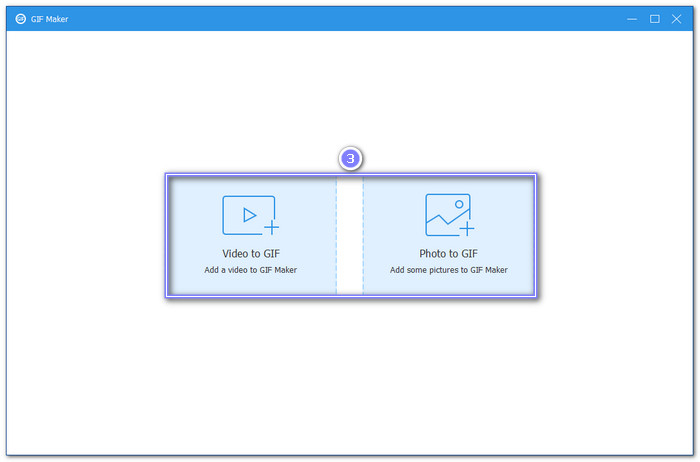
Step 2Now, drag and drop your GIF file into the main interface. You can also use the Video to GIF or Photo to GIF options to upload a file. Once added, your GIF will appear in the preview section.
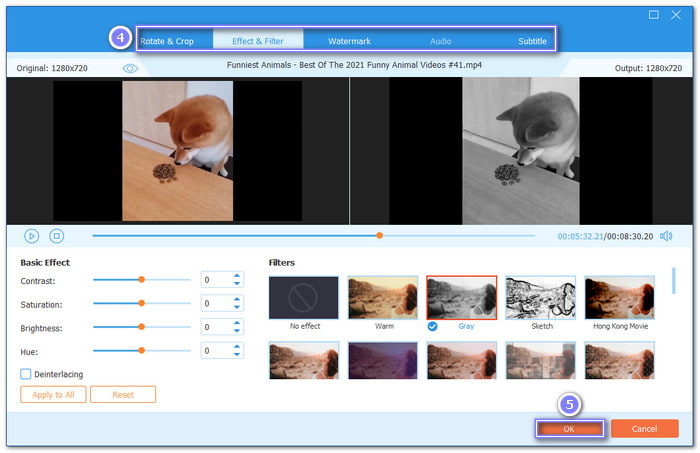
Step 3To access the editing tools, click the Edit button.
- Rotate & Crop: Rotate the GIF in any direction or crop unnecessary frames.
- Effect & Filter: Adjust brightness, saturation, contrast and apply filters to enhance the GIF.
- Watermark: Incorporate a text or image watermark to personalize your GIF.
- Subtitle: Overlay subtitles or captions to make the GIF more engaging.
You can all use these editing tools to refine your GIF. Ensure to press OK in each tab to apply the edits you made.
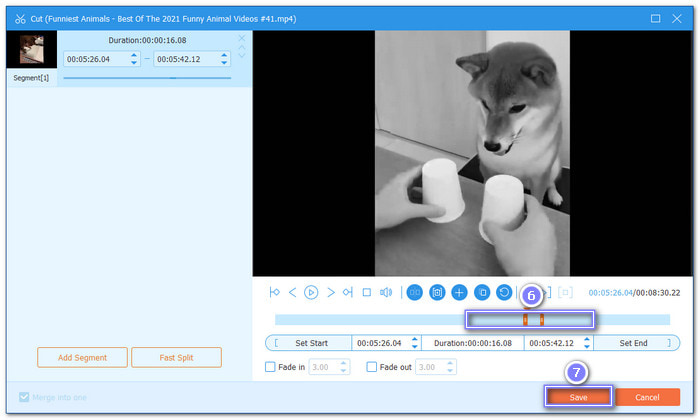
Step 4After editing, you can trim the GIF. Click the Cut button to remove unwanted parts and adjust the GIF length. Next, change the Output Size and Frame Rate to match your needs. Also, enable the Loop Animation option to let your GIF continuously play. You can preview changes before finalizing.
Step 5Once you are happy with your edits, click Generate GIF to save the new file. Your GIF will be created in high quality and ready to share or use.
Bonus Tip: Besides editing GIFs, Tipard Video Converter Ultimate lets you convert GIFs to MP4, MOV, WMV, and more. If you need a different format, this tool has you covered.
Part 2. How to Edit GIFs on iPhone
GIPHY CAM is an exciting tool for making and editing GIFs right on your iPhone. It lets you add stickers, filters, and captions to your GIFs. You can also adjust the speed, trim unwanted parts, or add fun animations. It connects with GIPHY's vast library, allowing easy access to trending GIFs. This app also supports sharing directly to social media. With its playful features, GIPHY CAM turns simple clips into eye-catching animations that stand out.
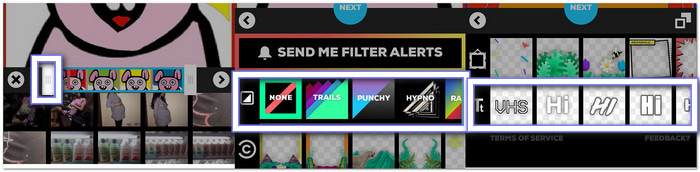
Step 1Go to the App Store, search for GIPHY CAM, and tap GET to install it. Open the app once it is installed. The first time you use it, allow camera access so you can create and edit GIFs.
Step 2Tap the Camera Roll button in the bottom left. Select a GIF to edit or pick a video to convert into a GIF.
Step 3Adjust the timeline edges to trim the GIF. It helps keep only the essential parts of your animation.
Step 4Add filters, stickers, and text by tapping the options in the editing menu. Adjust the size and position by dragging and pinching on the screen.
Step 5Tap NEXT, then SAVE GIF to keep it in your Photos app. You can share it with family or friends or post it online.
Part 3. How to Edit GIFs in Photoshop
Adobe Photoshop is the go-to software for professional GIF editing. Unlike basic editors, it gives complete control over every frame. You can add layers, adjust colors, insert text, and apply filters to edit GIFs. It supports high-quality GIF creation and advanced animations.
Photoshop also lets you edit frame timing for smooth playback. It is a powerful tool for making detailed, high-resolution GIFs with precision. Without a doubt, this software is ideal for serious GIF creators who want complete creative control.
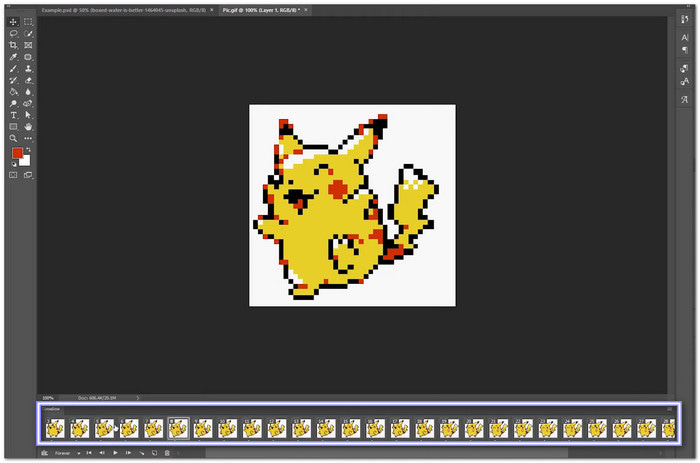
Step 1Launch Photoshop, go to File and then Open. Select your GIF to load it into the Timeline panel, where each frame is visible.
Step 2Click on a frame and use tools like Brush, Text, or Eraser to make changes. Each frame is separate, so edits apply only to the selected one.
Step 3Duplicate frames by right-clicking a frame and selecting Duplicate Frame. To remove one, select it and hit the Trash button.
Step 4Click the time below a frame to change its duration. Increase or decrease the delay to control how fast your GIF plays.
Step 5Go to File, Export, and then Save for Web (Legacy). Choose GIF format, tweak settings, and click Save to store your new GIF.
Part 4. How to Edit an Animated GIF with GIMP
GIMP is a free and open-source software that can edit animated GIFs with great flexibility. It works with layers, so each frame of a GIF can be modified separately. You can crop, resize, add text, or apply effects. GIMP also supports transparency, making it useful for creating smooth animations.
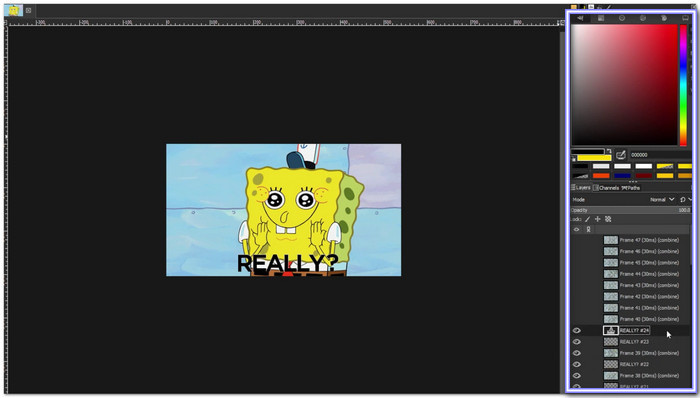
Step 1Launch GIMP and open your animated GIF. Each frame appears as a layer in the Layers panel, starting from the bottom up.
Step 2Modify layers individually. You can erase parts, add text, or draw on them, but keep in mind the 256-color GIF limit.
Step 3Rename layers to change frame speed. Add (100ms) or other values in the layer name to control playback timing.
Step 4Use the playback feature to check how the GIF looks. Adjust frames if needed for smoother animation.
Step 5Go to File, and then Export As. Select GIF format and enable animation settings. For the last step, click Export to save your finished GIF.
Part 5. How to Edit GIFs Online
Clideo is a simple tool that allows you to edit GIF online for quick GIF editing. It works in a web browser, so no software download is needed. You can add text, resize, trim, and crop GIFs with just a few clicks. It enables users to import files from their device or cloud storage. Since it runs online, it may not be suitable for large or complex GIF projects. However, for fast and easy edits, Clideo is a handy option.
Step 1Open Online GIF Editor - Clideo's official website and click Get Started. Upload a video or image sequence from your device or cloud storage.
Step 2Drag the edges to trim the clip. Adjust the frame size and aspect ratio to fit your needs.
Step 3Click the Text tab to insert captions. Use filters or speed controls to enhance the animation.
Step 4Play the GIF to check your edits. If something looks off, make changes before finalizing.
Step 5Hit Export and choose GIF as the format. Once processed, download it to your device or cloud storage.
Conclusion
You now know how to edit GIFs, and that makes us happy. How was your experience? Which tool is better to use? We want to hear from you!
If you are still undecided but want the best tool for GIF editing, Tipard Video Converter Ultimate is the way to go. It has everything you need to edit your GIF. You can crop, add text, adjust effects, and preview changes easily. So, what are you waiting for? Try it now and create and edit amazing GIFs without hassle.
More Reading
About the Author