A GIF is a short, looping animation made from pictures or videos. People use GIFs because they load fast, play automatically, and work on almost any device. They are great for expressing emotions, showing reactions, or sharing fun moments without sound.
There are different ways to create it on iPhone, and we will provide that all here. We know you are excited about it, so without further discussion, continue reading the following parts to learn how to make a GIF on iPhone!
Part 1. How to Make a GIF on iPhone from Photos
Your iPhone has built-in tools that make GIF creation easy. One of the best options is Live Photos, which captures a short burst of motion with every picture. With just a few taps, you can turn these moments into fun, looping animations. However, the effects are limited to basic loops and bounces.
Rely on the steps below to find out how to make a GIF on iPhone from Photos:
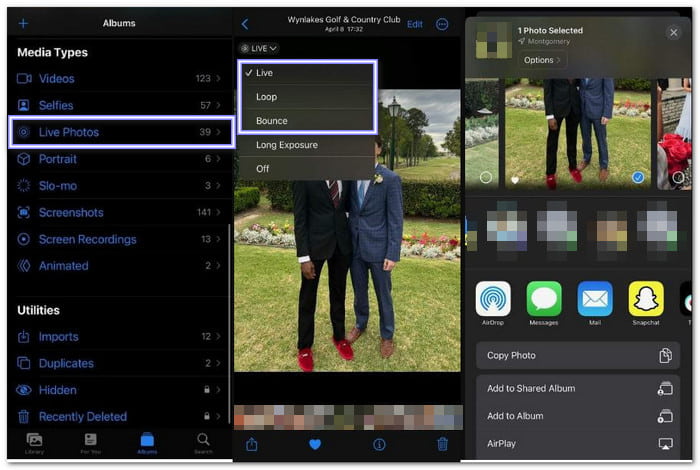
Step 1 Press on the Photos app on your iPhone.
Step 2 At the bottom, tap Albums. It will show all the different folders on your device.
Step 3 Scroll down to the Media Types section. Tap Live Photos to see all the Live Photos you have taken. Pick the Live Photo you want to turn into a GIF. Tap on it to open it in full screen.
Step 4 Swipe up on the screen. You will see different effects: Live, Loop, and Bounce.
- Loop makes your GIF play over and over without stopping.
- Bounce plays the GIF forward and then in reverse, like a boomerang.
Step 5 Once you pick an effect, your GIF is ready. Tap the Share button. You can send it through Messages, Email, or Social Media.
Part 2. How to Make GIFs on iPhone from Video Using Shortcut
If you want more control over your GIFs, the Shortcut app is a good option. It lets you turn videos into GIFs without needing extra apps. You can trim, edit, and adjust quality all within your iPhone's system. The best part? Once you set it up, you can create GIFs in just a few taps.
The downside is that it might take a little time to learn how to use Shortcuts if you have never used them before. But once you do, you will have a fast and reliable way to make GIFs from your videos anytime.
Continue reading to learn how to make a GIF from a video on iPhone using Shortcut:
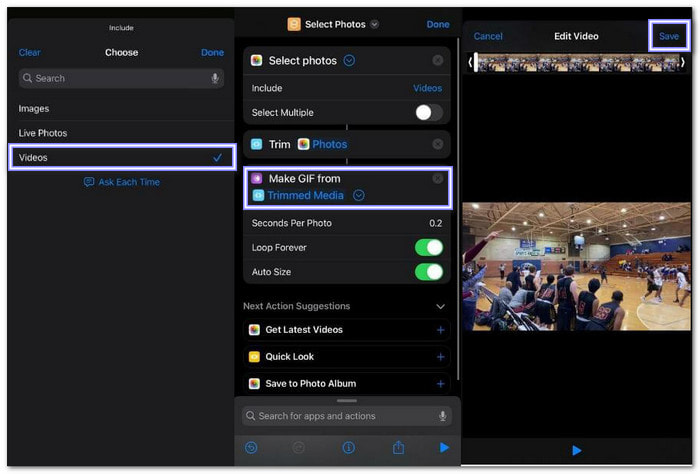
Step 1 Launch the Shortcut app on your iPhone. Tap the (+) button in the top corner to create a new shortcut.
Step 2 In the search box, type Select Photos and add it. Tap Show More, then change the setting to display only videos. This way, you can pick a video instead of a photo.
Step 3 Search for Trim Media and add it to your shortcut. It lets you cut your video to the correct length before turning it into a GIF.
Step 4 Search for Make GIF and add it. Tap Show More to adjust the quality and length. A shorter GIF will have better quality.
Step 5 Add Quick Look so you can see your GIF before saving. Tap the Three dots to name your shortcut. Press Play, select your video, then tap Share to save or send it.
Part 3. How to Make a GIF Video on iPhone with a Third-Party App
For those who want advanced GIF-making features, Simplified is a great choice. This app lets you create GIFs with music, effects, and animations and add text to GIFs to make them stand out. You can customize every part of your GIF, making it perfect for social media. The downside is that it takes up storage space and requires an account to use all features. However, if you want a creative, high-quality GIF, an app like Simplified is the way to go.
Discover how to make a GIF video on iPhone with Simplified:
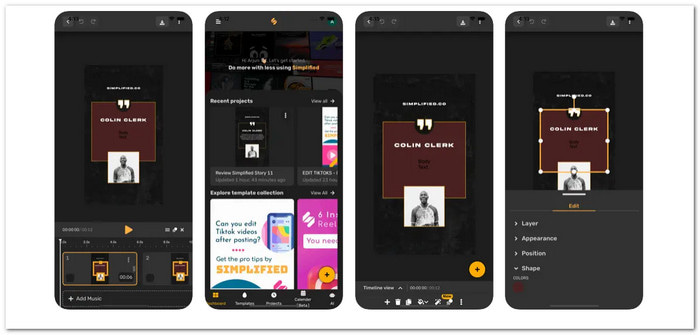
Step 1 Get the Simplified app from the App Store. Open it once the installation is complete.
Step 2 Choose a GIF template or upload a video from My Assets. It is the starting point for your GIF.
Step 3 Add music, fonts, visuals, or animations to make your GIF stand out. Tap and hold elements to apply them. You can also adjust the size to make sure it looks great on mobile.
Step 4 Check how your GIF looks before saving. Make any final changes to get it just right. Once satisfied, download your GIF to your iPhone or share it directly on social media.
Bonus Tip. Advanced Tool to Make A GIF on Windows/Mac
We are done on how to make a GIF on iPhone; now, let us move on how to create one on Windows or Mac.
A great way to turn videos into GIFs is by using Tipard Video Converter Ultimate. This advanced tool makes the process fast and simple. With just one click, you can make high-quality GIFs. It supports many video formats, so you do not have to worry about compatibility.
Before saving, you can preview your GIF to check if it looks right. This tool also lets you cut, edit, adjust the size, change the frame rate, and enable loop animation for a smoother result. Best of all, your GIFs will be clean and watermark-free.
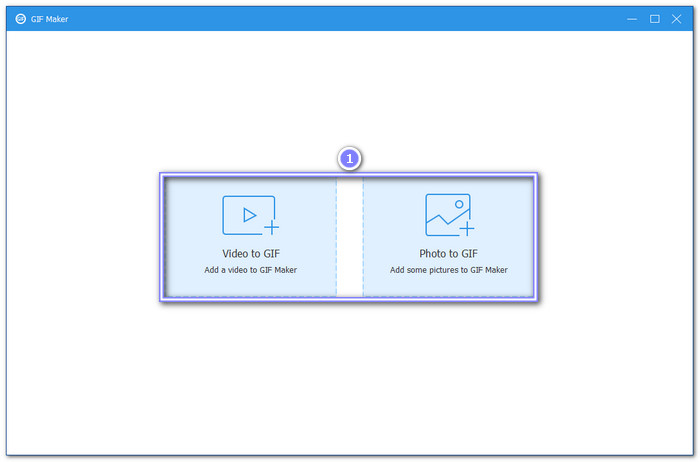
Step 1 Get Tipard Video Converter Ultimate installed on your Windows or Mac computer. Open the program, go to the Toolbox tab, and select GIF Maker to get started.
Step 2 Click Video to GIF to add a video clip. If you want to use images, choose Photo to GIF instead. But here, we will pick Add a video to GIF Maker.
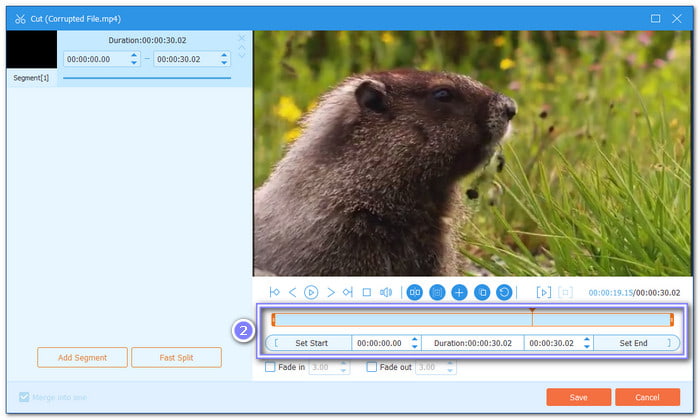
Step 3 The video will automatically play on the preview screen. If your video is too long, click the Cut button. Adjust the sliders to choose the best part for your GIF. You can also enter a specific start and end time.
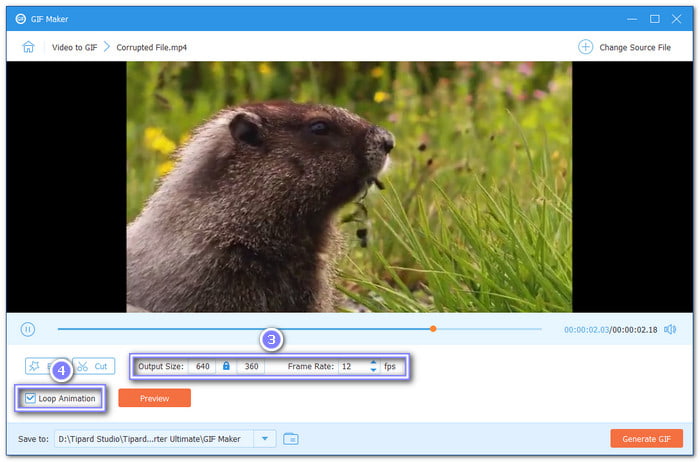
Step 4 Set the Output Size and Frame Rate to get the best quality. Also, to loop your GIF, enable the Loop Animation option so your GIF will play continuously.
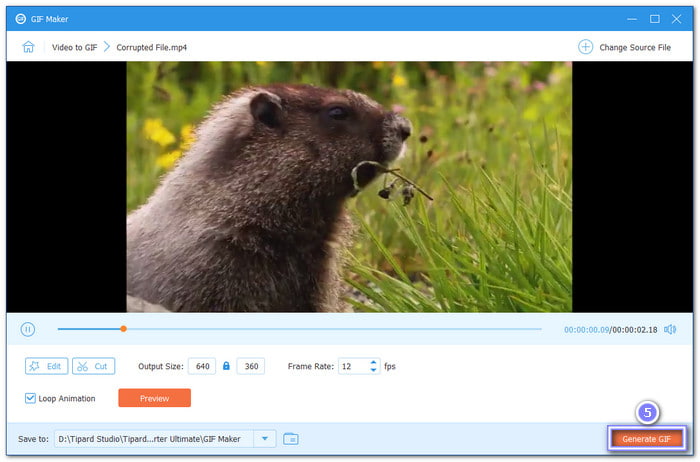
Step 5 Finally, click the Generate GIF button to save your file. Your new GIF will be ready in seconds, and you can find it in your saved folder.
Conclusion
You now know how to make a GIF on an iPhone. Whether you use Live Photos, Shortcut, or a third-party app, each method gives you a way to create fun and shareable GIFs. However, making GIFs is not only limited to iPhones; you can also create one on Windows or Mac, and you can rely on Tipard Video Converter Ultimate. It offers more control, better quality, and extra editing options. We want the best for your GIF, so we offer you the best tool!
More Reading

About the Author