Learning how to record video on an iPhone can save the moment when you want to capture a reaction, record a tutorial, or save a live game highlight. Imagine quickly recording a video call, a funny clip, or a special moment without missing a beat. This guide walks you through everything, from setting up screen recording and using advanced features to editing your videos and even using a professional tool like Tipard Screen Capture.
Part 1. How to Set Up Screen Recording
Would you like to record tutorials, games, or perform other actions seamlessly on your iPhone? Using built-in capabilities, you can record your screen and save everything in high quality on your device. To access this functionality, you must first add it to your Control Center so that it is immediately available and can be accessed at any given time.
Step 1 Go to your Settings and select Control Center.
Step 2 Select Customize Controls.
Step 3 Look for Screen Recording and select the green plus (+) button.
From now on, Screen Recording will be available in your Control Center. You would not need to waste time scrolling through the menus, and you can record your screen at any moment. Whether it is to share some tips or save useful information, it takes only seconds to add it.
Part 2. How to Use Screen Recording
You can record your screen in real time, add the voice that you want, and even include music to add background music in order to create an interesting video. Recording can include everything from video calls to games and tutorials, and it can all be done through the iPhone screen recording.
1. Basic Screen Recording
Step 1 To start with, you need to access your Control Center, so swipe down.
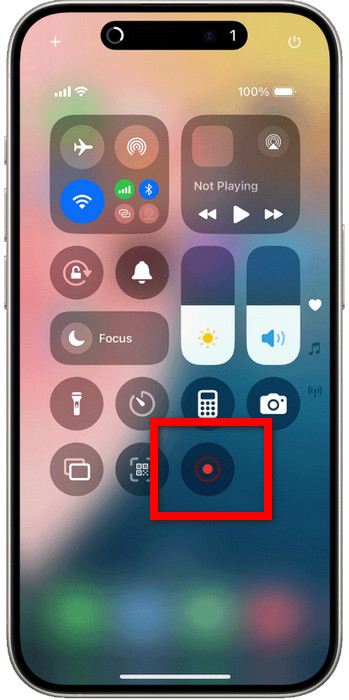
Step 2 Next, touch the Screen Record button. There will be a countdown from three.
Step 3 Execute the actions you would like to capture.
Step 4 Tap the red status bar or the record button a second time to stop the screen recording.
2. Record with Microphone
Step 1 Press and hold on the Screen Record, which you just added to the Control Center.
Step 2 Tap the Microphone button to turn it on.
Step 3 Then, when you start recording, your voice or ambient sound will be recorded.
3. Record with Background Music
Step 1 Activate your screen recording.
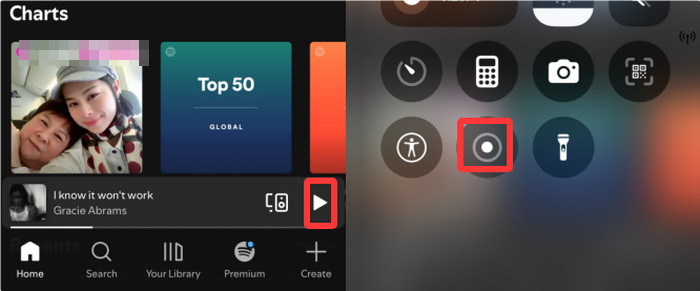
Step 2 Then, while recording, you can play some tracks from Spotify or Apple Music.
Step 3 The audio from the application will be captured along with your screen actions. This makes the resulting video more interesting and lively.
Part 3. Screen Recording Settings & Features
1. Quality and Storage Settings
When it comes to your recordings, you can choose to save them either to your photos library, or you can save them directly to the cloud, which is also a part of Apple( iCloud). Choosing the appropriate resolution and file format is essential, as the two help to balance video quality and file size. Taking your recording in good quality will result in a video with good definition and clarity, but it will take more storage. Opting for standard quality will save some space while still maintaining a good amount of clarity, especially when you screen record on iPhone for everyday tasks.
2. Model-Specific Features
• If you have the iPhone 17/16/15/14/13 Pro models, you can also use ProRes recording, a professional format that is useful for creating high-quality videos and editing.
• If you have a newer model iPhone 11 and above, you will be able to have basic screen recording, which will be smooth and effective for everyday screen captures.
Part 4. How Long Can an iPhone Screen Record?
To date of your recording, there are no software limits regarding the length of your iPhone screen recording, but here are some criteria you should consider.
1. Limiting Factors
• Storage Space: If your iPhone does not have enough iPhone storage, you won't be able to make long-term recordings. The recording will automatically stop once you run out of storage space.
• Battery Life: The recording takes a lot of power. If your recording takes a long time, it will drain your battery.
• Overheating: If your recording takes a really long time, your recording might drain your battery. If this happens, your iPhone may pause or stop recording to prevent damage to your internal parts.
• No Software Limit: If recording space, battery, and heat are sufficient, there is no time limitation for recording.
2. Storage Estimates
• 1080p: Approximately 130MB per minute
• 4K: Around 350MB per minute
• ProRes (Pro models only): Roughly 2GB per minute
Part 5. Editing and Managing Screen Recordings
Once you are finished recording, you do not have to spend extra time in the software to edit the video. The recording is available on your Photos app, and it can be trimmed or cropped in seconds, making it just as simple as when you record Skype video on your device.
Step 1 Search screen-recorded videos in the Photos app.
Step 2 Edit the video by clicking the Edit button in the top right corner.
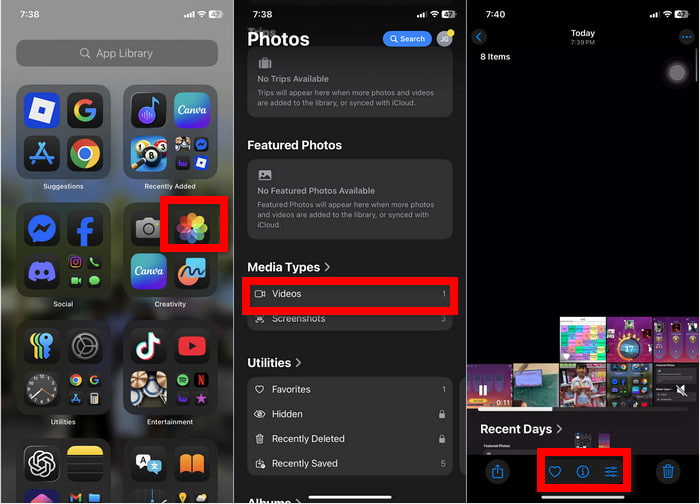
Step 3 Move the trim on the video to not include parts of the video you want to be removed.
Step 4 If required, improve the video quality by changing the orientation, cropping the video, or higher the exposure.
Step 5 Press Done to apply your edits.
Step 6 Share directly via Messages, Mail, or social media, all from within the Photos app.
Bonus: Best Video Recorder Tool to Record Your iPhone Without Limit
If you need to record your iPhone screen freely and you want to do it without restrictions, an amazing application is Tipard Screen Capture. It enables you to record video and audio from your iPhone or other external devices directly to your computer and in great quality. Because Tipard lets you record any screen activity, you can record activities without any time or format restrictions, whether it be from playing a game, teaching someone over a video tutorial, or conducting a video call.
- Capture iPhone screen in full HD or higher resolutions.
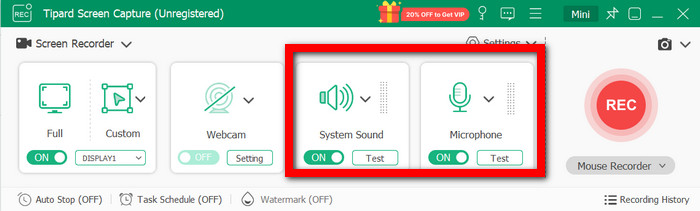
- Record both system sound and microphone audio simultaneously.
- Choose output formats like MP4, MKV, or others for easy playback.
- Add webcam overlay, annotations, or draw on screen during recording.
- Preview, edit, and share recordings instantly with built-in tools.

Step 1 Download and Install
To set up an application called Tipard Screen Capture on your computer, go to the official Tipard website, download Tipard Screen Capture, and carefully follow the instructions to complete the installation.
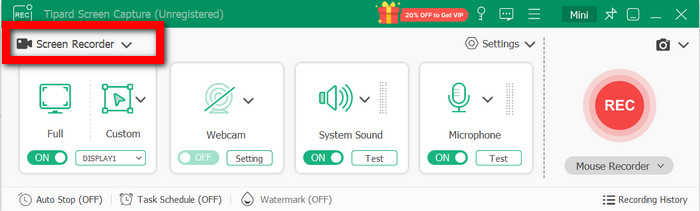
Step 2 Launch and Select Mode
To start the screen capturing, open the tool and from the main interface, click on the Screen Recorder option.
Step 3 Connect Your iPhone
Use the usb cable to connect the iPhone to the computer. Your computer should be set to use the iPhone screen as the recording source.
Step 4 Adjust Settings
Please choose an area on the screen and record it along with your preferred audio source, which can be either the System Sound or your Microphone.
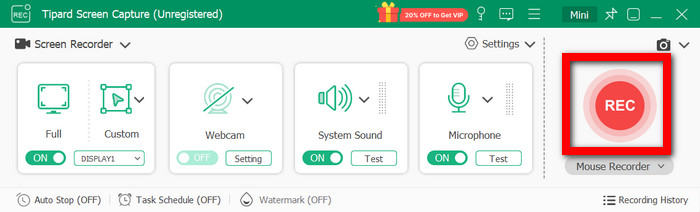
Step 5 Start and Save Recording
To start recording, click on the record button (REC). If you want to stop the recording, click on the stop button.
Conclusion
In this post, we covered how to record iPhone video effortlessly, from setting up screen recording and capturing audio or background music to editing in the Photos app. For unlimited, high-quality recordings, Tipard Screen Capture takes your videos to the next level, making it simple to record, edit, and share anytime.
More Reading


About the Author