Key Takeaways
From what we consider optimal video compression and encoding procedures, we will use Tipard Video Converter Ultimate, iMovie, and ClipChamp. Import your video and set your parameters so you can maintain the desired quality and compress the video.
- Flexibility: Move the compression slider; adjust the resolution, or the bitrate.
- Compatibility: Most video compression tools are able to compress and convert common video file formats such as MP4, MPEG, AVI, and MOV.
- Editing: You can cut, trim, and crop videos and even add watermarks before compression.
- Quality: Reduce videos to even smaller sizes without noticeable loss in quality.
Need to compress video before sending it to friends, uploading to YouTube, or saving storage space? Whether it is a 4K travel vlog or a quick smartphone clip, this guide shows practical tools and step-by-step methods for efficient video compression.

Part 1. Comparison of the 7 Video Compressors
| Video Compressor | Compress by Slider / Resolution / Size | Max Resolution | Multi-Format Support | Trim / Crop / Edit | DVD Rip / Collage |
|---|---|---|---|---|---|
| Tipard Video Converter Ultimate |  |
8K | |
|
|
| iMovie | (Resolution) |
4K |  |
|
|
| ClipChamp | (Resolution) |
4K | |
|
|
| QuickTime | (Trim only) |
4K | |
(Trim only) |
|
| Create a ZIP File | |
Original | |
|
|
| Video Compress - Shrink Videos | (Slider) |
1080p | |
|
|
| Video Compressor App | (Slider / Resolution / Bitrate) |
1080p | |
|
|
Our Test Standards
In this case, all tools were tested based on the same 4k MP4 video. The video was 5 minutes long and 1.2GB in size.
- Targets: We want to reduce the size by at least 60 to 80 percent of the original and keep the same quality of the audio. No upscaling should be done.
- Criteria: For all tools, we consider file size, speed, quality, ease of use, and supported formats.
- Method: We set all the tools to the same default parameters and quality/size balancing slider. We also set the video resolution to 720p and 1080p. All tools were subjected to the same parameters.
- Key Insights: Tipard Video Converter Ultimate gave the best speed, quality, and compression. iMovie/ClipChamp worked for casual users. Mobile apps were the fastest but lost quality. ZIP files only help with sharing.
Part 2. 5 Ways to Compress Video on Windows and Mac
1. Tipard Video Converter Ultimate (Recommended)
Tipard Video Converter Ultimate is a multifunctional tool that allows you to convert, edit, compress, and rip DVDs. It is capable of managing large and high-res videos and supports over 500 different video and audio formats.
Platform: Windows, Mac
- Convert and compress videos of any resolution, including 8K, 5K, 4K, 1080p, 720p, and 480p.
- Adjust videos by cropping, trimming, merging, and rotating, adjust brightness and contrast, and add watermarks.
- Rip DVDs to various digital formats or to ISO or DVD folders.
- Make custom music videos and video collages.
- Convert audio files to MP3, AAC, FLAC, etc.

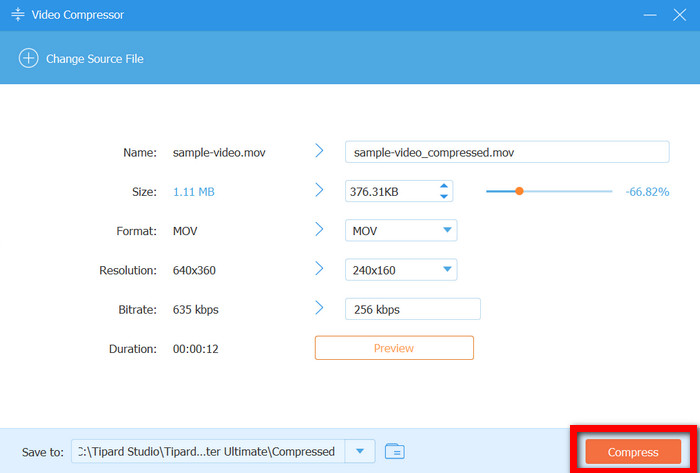
Step 1 Download and install Tipard Video Converter Ultimate on your computer.
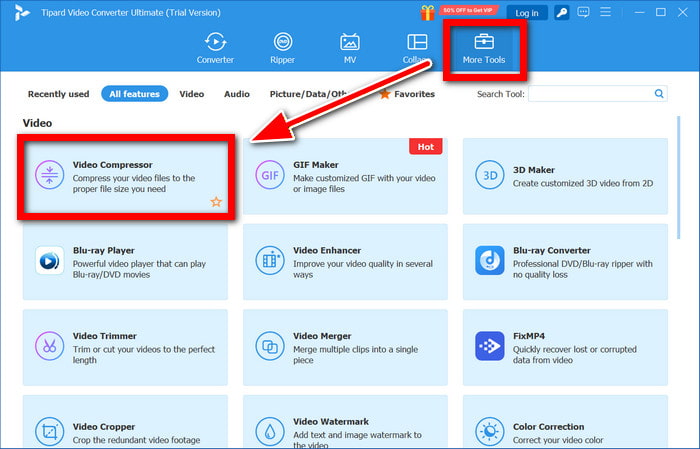
Step 2 Launch the program, then go to the More Tools tab and select Video Compressor.
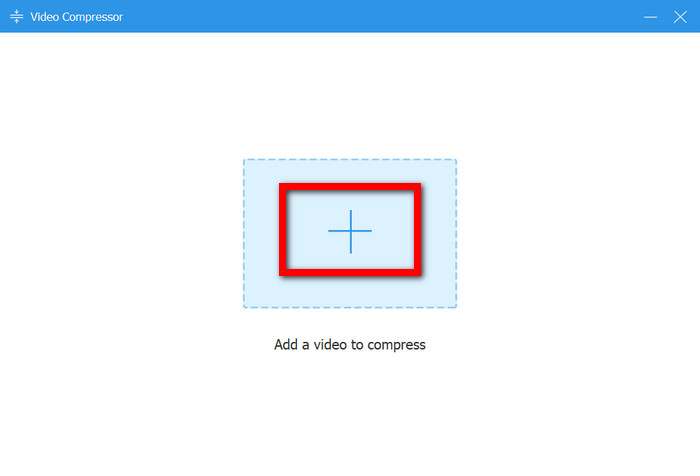
Step 3 Click the Add button to add the video you want to compress.
Step 4 Adjust the Size slider to control how much the video will be compressed.
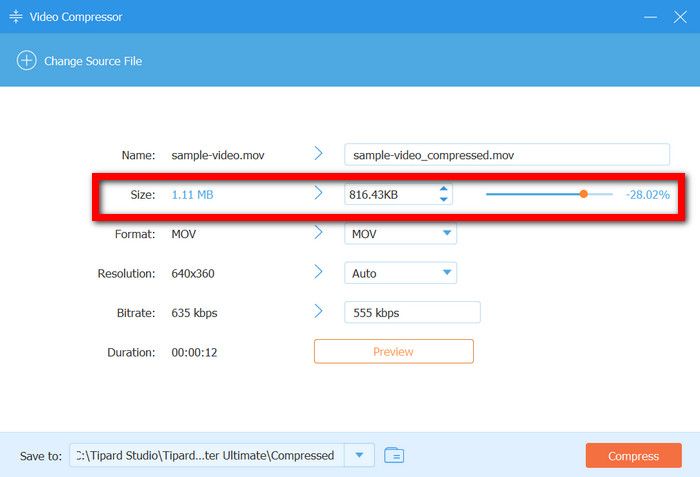
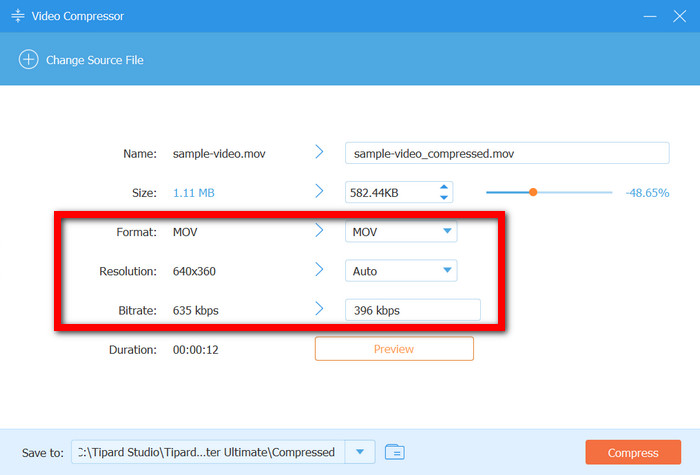
Step 5 Modify the Format, Resolution, and Bitrate if needed.
Step 6 Click Compress to automatically compress and save the video.
Why We Select It
Tipard Video Converter Ultimate provides precision and simplicity in video compression. You can compress a video to a target file size that you set, or you can adjust a slider to modify the level of compression. It also supports a large variety of video formats to ensure compatibility across devices and also provides high-quality and fast compression through proprietary hardware.
- Compression is very fast due to new hardware.
- The output quality won't suffer.
- There are a variety of functions, including compression, DVD ripping, and video conversion.
- Advanced features may overwhelm beginners.
2. iMovie (Mac)
iMovie is Apple's pre-installed video editing software for Mac. It offers features such as video trimming, editing, and resolution reduction.
Platform: Mac
Key Features:
- Video trimming and cropping.
- Video resolution adjustments.
- Effects, filters, and music additions.
Step 1 Launch iMovie and import the video.
Step 2 Make edits and/or trim clips as needed.
Step 3 Go to the menu and select File > Share > File….
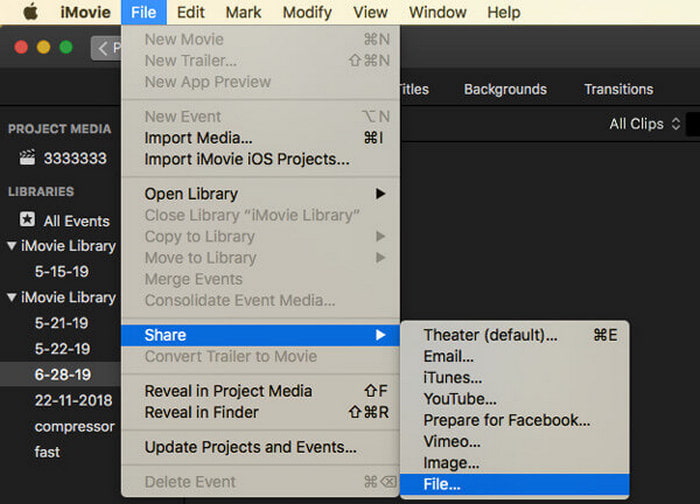
Step 4 Choose a decreased resolution (i.e., 720p).
Step 5 Export the video.
- Completely free and quite intuitive.
- Fully integrates with the Apple ecosystem.
- Mac/iPhone exclusive.
- Fewer format options compared to industry standards.
3. ClipChamp (Windows 11)
ClipChamp, the built-in video editing software for Windows 11, efficiently edits and compresses videos using resolution and format changes.
Platform: Windows 11
Key Features:
- Video conversions and compressions.
- Video editing, trimming, and cropping.
- Exports in MP4, MOV, and AVI formats.
Step 1 Launch ClipChamp and upload your video.
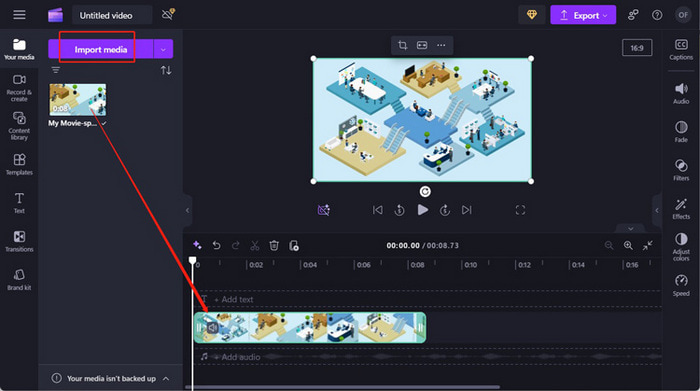
Step 2 Drag the video into the editing timeline.
Step 3 Click Export and select a lower resolution.
Step 4 Export the video.
- Completely free for Windows 11 users.
- The interface is very easy to use.
- Not accessible to older Windows versions without an external download.
- Fewer available compression options compared to industry standards.
4. Trim Video (QuickTime Player for Mac / Photos for Windows)
Trimming keeps the essential parts of the video and removes the unnecessary ones. This will also help reduce the size of the video file.
Platform: Trimming keeps the essential parts of the video and removes the unnecessary ones. This will also help reduce the size of the video file.
Key Features:
- Mac (QuickTime), Windows (Photos)
- Remove some parts of the video.
- Maintain core video content.
Step 1 Start QuickTime (on Mac) and Photos (on Windows), and open the video.
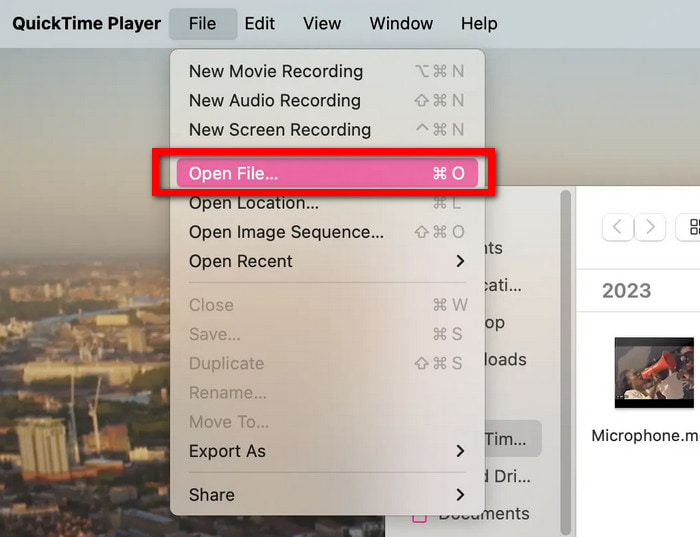
Step 2 Select Edit and then Trim (on Mac), or simply Trim (on Windows).
Step 3 Adjust the sliders until the part you want to keep is selected.
Step 4 Select Trim (on Mac), and Save as copy (on Windows).
Step 5 Save the video that you have trimmed.
- Preserves the main content when you trim the video.
- Fast and easy.
- Only limits the video; the file size may still be big.
5. Create a ZIP File
When you have multiple videos that you want to share or store, you may want to zip the videos. This process also helps to compress the videos at the same time.
Platform: Windows, Mac
Key Features:
- Put one or several videos into an archive that is compressed.
- You can store and share them easily.
Step 1 Find the video that you want to put in an archive.
Step 2 By using the right click, send to the Compressed (ZIP) folder (on Windows) and Compress [File] (on Mac).
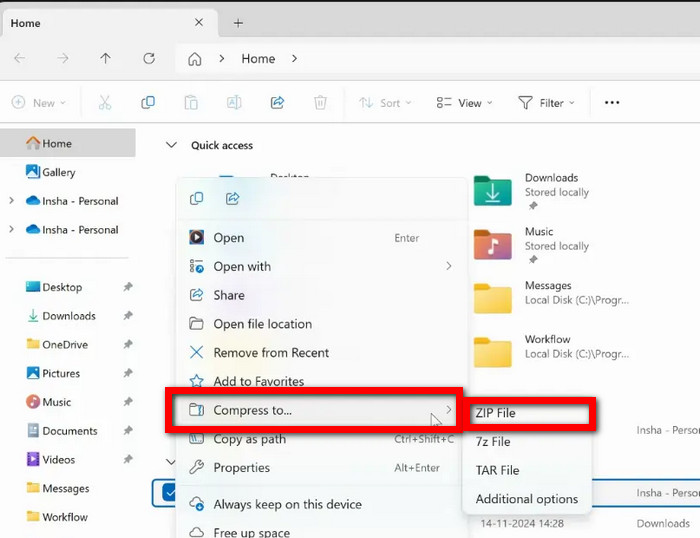
Step 3 Now you will find a new ZIP file containing the videos, and it will be in the same location as the original video file.
- You do not need additional software.
- It is easy and practical to share videos.
- When you have large files, the compression will be poor.
- No compressed videos for playback.
- The quality will remain the same, and the video size will not change.
Part 3. 2 Ways to Compress Video on iPhone and Android
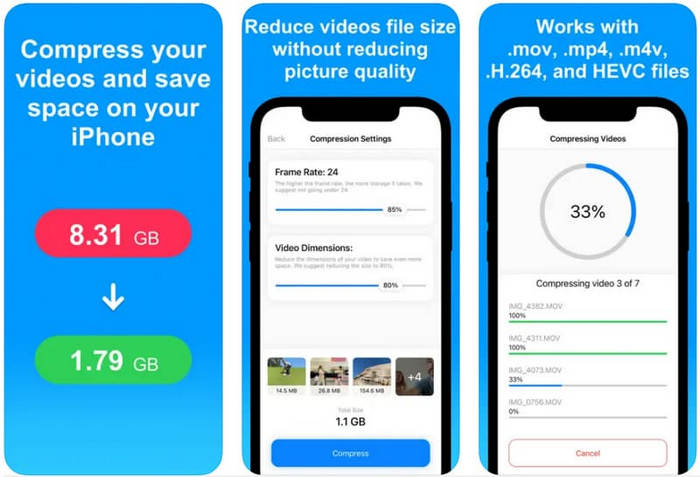
1. Video Compress - Shrink Videos (iPhone)
Video Compress: Shrink Videos is an iOS app that focuses on reducing the size of video files. Using a simple quality slider that adjusts compression levels, the app facilitates uploading and sharing on social media and messaging apps.
Platform: iPhone, iPad

Step 1 Download and launch Video Compress - Shrink Videos on your iPhone.
Step 2 Choose a video from your gallery that you wish to compress.
Step 3 Move the quality slider to adjust the desired compression level.
Step 4 Preview the video to see how much the file size will change.
Step 5 Click on the Compress button, and the video will be saved.
- Compression can be done using a simple slider.
Short video compression is done quickly by adjusting the video frame rate.
- The app supports only a limited number of formats.
- Compression can lead to significant quality loss.
2. Video Compressor App (Android)
Video apps for Android, such as Video Compressor, offer video compression along with adjustments to resolution, bitrate, and the ability to edit and trim videos on the go.
Platform: Android
Step 1 Download the Video Compressor app, which is free.
Step 2 Open the app, and add the video to the app.
Step 3 Choose what you want to adjust (resolution, bitrate, or trim).
Step 4 Select Export or Save to start compressing the video.
Step 5 Observe the size and playback quality of the video.
- The app functions without an internet connection.
- There are many ways to customize compression.
- The free version has a watermark.
- The free version has many features that are locked.
Conclusion
Learning how to compress a video helps you save storage, speed up uploads, and share content easily without losing quality. With tools like Tipard Video Converter Ultimate, iMovie, ClipChamp, and mobile apps, you can efficiently reduce file size while keeping your videos sharp and accessible.
More Reading

About the Author