If you have ever joined an important work meeting, online class, or client call and worried about missing key details, learning how to record a Teams meeting can make a big difference. Whether you need recordings for review, sharing, or documentation, knowing the right methods on any device helps you stay organized and prepared in any situation.

Part 1. Can You Record a Teams Meeting?
Recording Microsoft Teams meetings is possible, but it is subject to the role and permission level. Organizers and internal users can start and stop recordings through Teams. A recording notification is sent to all participants.
Participants and attendees without signed account credentials cannot record through Teams, but can use screen recording software to record the meeting from Windows and Mac computers, as well as iPhones and Androids.
Recording meetings can solid meetings covering:
- Note taking
- Training and onboarding material creation
- Documenting company activities and interviews
Part 2. How to Record a Teams Meeting on Any Device
To record a Teams meeting on any device, follow the step-by-step guide.
On Desktop (Windows or Mac)
The steps are simple if you are the organizer or if you are from the same organization as the meeting participants.
Step 1 Launch Microsoft Teams. From the menu on the left, click on Calendar.
Step 2 You will either select Meet now to create a new meeting or join an already scheduled meeting.
Step 3 Then, click on the More options button, which is illustrated by three dots next to the camera button.
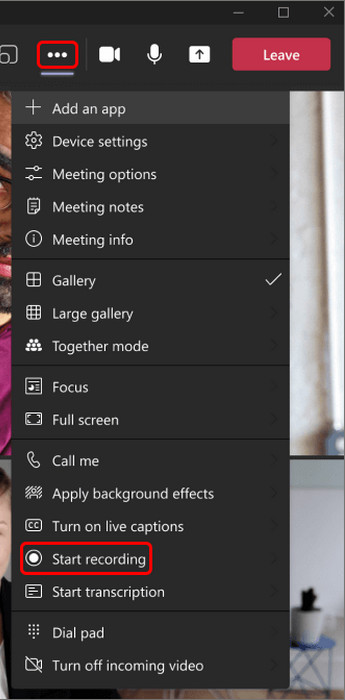
Step 4 Click on Start recording.
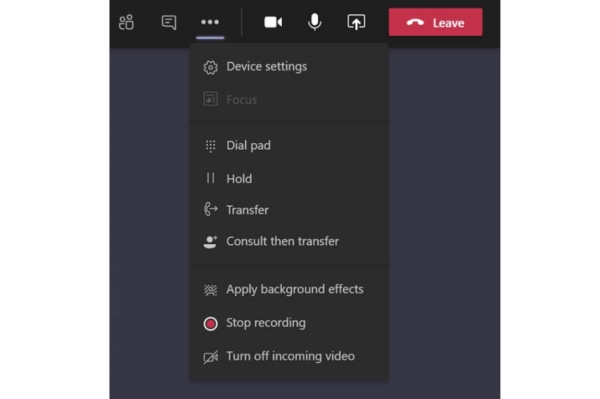
Step 5 To stop the recording, click on More options again and select Stop Recording.
Step 6 For channel meetings, recordings will be saved in SharePoint. Other meetings will have recordings saved in the Recordings folder in OneDrive.
On Mobile (iPhone or Android)
If you are recording from your mobile device while you are on the go, you will need to update your Teams app first. Then complete the following steps:
Step 1 Launch the Microsoft Teams app and tap on Calendar located at the bottom.
Step 2 You can either join a scheduled meeting or create one by tapping the Camera button.
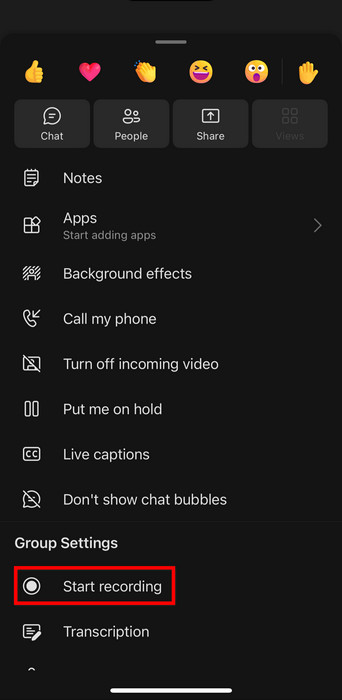
Step 3 Tap on More options at the bottom of the screen.
Step 4 From the menu, select Start Recording.
Step 5 To stop the recording, go to More options and select Stop Recording.
Step 6 For mobile, recordings will save to SharePoint for channel meetings and OneDrive for all other meetings.
Part 3. How to Record Teams Meeting Secretly
Tipard Screen Capture
Recording a Teams meeting without the participants knowing can be tricky if you do not have the right tool to start the recording. Tipard Screen Capture is highly recommended for this purpose. It is professional, user-friendly, and you can control the recording aspects of the meeting without anyone being alerted.
Step 1 Download Tipard Screen Capture
Downloading Tipard Screen Capture is easy. Go to its official website and get the software for your available operating system.
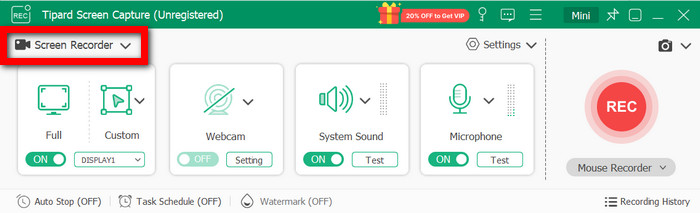
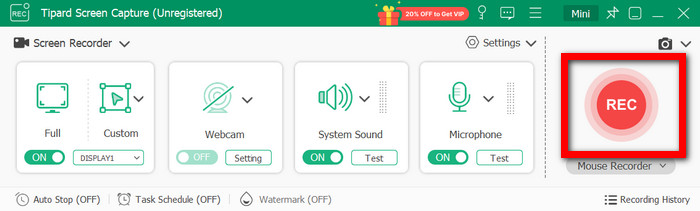
Step 2 Launch Tipard Screen Capture and Set Preferences
When you start the tool, decide what you are going to record and select the recording preferences, like Screen Recorder. In this case, you will have the custom recording area of the screen that you want.
Step 3 Start Record
Press the REC button to commence the recording. During the session, you can use the screen annotation features, draw, or add pictures using the recording tools.
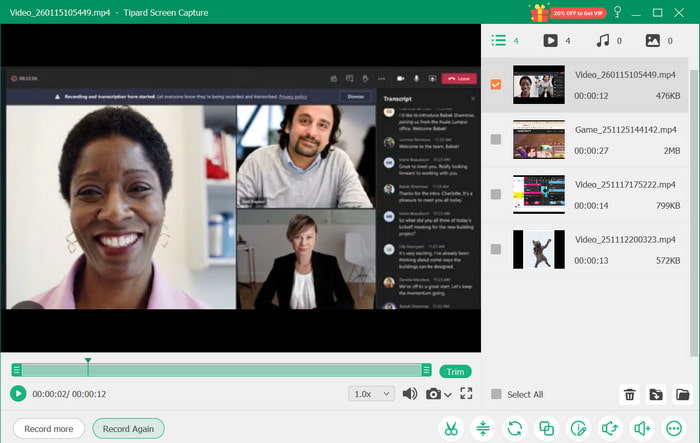
Step 4 Save and Stop Recording
After the meeting is over, click the Stop button. You can make edits, review the recording, and choose to save it on your device or use the share features to send it to YouTube or Instagram.
Why We Selected It
While recording Teams meetings without the other participants knowing, Tipard Screen Capture is more relevant than other options. Tipard Screen Capture is able to record meetings with HEVC and AV1 codecs, and it is able to record the meetings with no lags or issues, even if the recordings are long.
Using Microsoft Teams Copilot
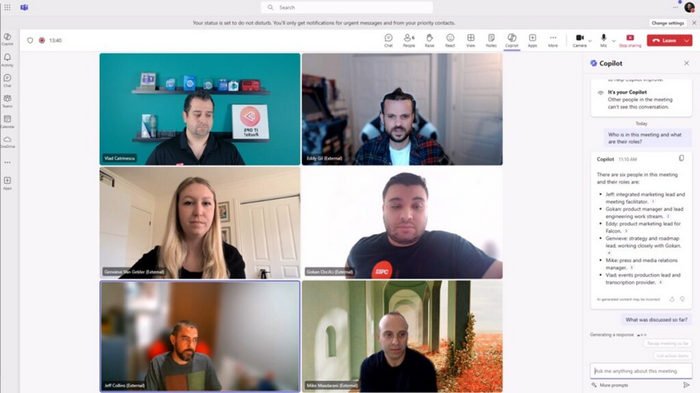
Microsoft Teams Copilot is an artificial intelligence assistant that records pertinent meeting details, including main ideas, action items, decisions, transcript highlights, and a summary, while complementing tools like a webcam recorder for visual capture.
Step 1 Before the meeting starts, ensure that the live transcription feature is on. Transcription is how Copilot records an audio stream.
Step 2 Press the Copilot button on your meeting controls to receive prompts or answer questions. Copilot provides a summary, highlights important information, and keeps track of who participates in the discussion.
Step 3 To answer questions such as What ideas were discussed? Who responded to this proposal? Use the prompt bar; Copilot uses the transcript and the chat to formulate a reply.
Step 4 If your meeting permissions allow it, answers provided by Copilot can be sent to Word or Excel for additional analysis and distribution.
Step 5 When the meeting concludes, go to the Recap tab (or the meeting chat) to see the notes and Copilot transcripts, and the points that you may want to follow up on.
Part 4. Tips on Microsoft Teams Meeting Settings
Below are 5 tips for better management of your Teams meetings.
- Manage Recording Permissions: Only meeting organizers and participants from the same company can record. Confirm everyone’s roles prior to scheduling, especially when using a screen recorder for Mac.
- Turn on Live Transcription: Transcription should be activated so that important information is captured, and Copilot can summarize what was said.
- Assign Roles Appropriately: Presenters can share screens, record the meeting, and control the meeting. Attendees can only view.
- Use Background Filters: Blur or change your background to enhance privacy and minimize distractions.
- Do a Tech Check: Be sure to test your mic, camera, and speakers prior to the meeting so you are not experiencing problems during the meeting.
Conclusion
Microsoft Teams meetings can be recorded to share, review and document important meeting discussions. Depending on what permissions you have, or if you are using another reliable system, you can record using a variety of devices and run your meetings efficiently without missing important information.
More Reading


About the Author