Resolution is the measurement taken to ascertain the definition and sharpness of a video picture. It is the number of pixels displayed on the screen, and it plays an important role in determining how sharp and detailed the video appears.
This guide begins by looking at the theory of video resolution and how it functions. It then compiles the most commonly utilized resolutions - like 720p, 1080p, and 4K - and presents typical scenarios where each is used. It also explains the difference between progressive ("p") and interlaced ("i") scan formats and features hands-on tips on how to change resolution settings.

Part 1. What Is Video Resolution
Video resolution refers to the amount of detail that a video image holds, measured by the number of pixels displayed across the screen's width and height. It is typically expressed as width × height, such as 1920×1080, which means the video has 1920 pixels horizontally and 1080 pixels vertically. Higher resolutions contain more pixels, resulting in more transparent, sharper, and more detailed images. Common video resolutions include 480p (Standard Definition), 720p (HD), 1080p (Full HD), 4K (Ultra HD), and 8K. As resolution increases, the video quality improves, but it also requires more storage space and higher internet speeds for streaming. The appropriate resolution depends on the viewing device, intended use, and balance of quality.
Part 2. List of Common Video Resolutions
SD (Standard Definition)
SD, or Standard Definition, typically refers to video resolutions of 480p (720×480 pixels). This was the typical resolution on DVDs, vintage TV shows, and early internet videos. SD has a low level of sharpness that's sufficient on small screens but appears fuzzy or pixelated on today's high-resolution displays. It's handy when bandwidth is restricted, or video quality doesn't matter.
HD (High Definition)
HD stands for High Definition, usually referring to 720p resolution (1280×720 pixels). This was the first big leap in video quality over SD, offering much clearer, sharper images. HD became popular with the rise of HD-ready TVs and was the standard for early HDTV broadcasts and YouTube videos. While it's now considered the lower end of high-definition options, HD still provides a good viewing experience, especially on smaller devices.
FHD (Full HD)
Full HD, also known as 1080p (1920×1080 pixels), is a step above HD and provides a much more detailed and crisp image. It became the standard resolution for Blu-ray discs, most streaming services, and modern TVs and monitors. Full HD is ideal for a wide range of content - from movies and sports to gaming - offering a great balance between quality and performance without requiring as much bandwidth or processing power as higher resolutions.
QHD (Quad HD)
QHD, or Quad HD, stands for 2560×1440 pixels, which is four times the resolution of 720p HD. It's often referred to as 1440p or 2K (though technically, 2K resolution is slightly different in film standards). QHD provides noticeably sharper visuals than Full HD and is commonly found in high-end smartphones, gaming monitors, and premium laptops. It's especially appreciated in gaming and professional design work where more screen detail and clarity matter.
UHD (Ultra High Definition)
UHD, or Ultra High Definition, typically is equivalent to 4K resolution, or 3840×2160 pixels. That is four times Full HD. UHD is used extensively across contemporary TV, streaming, and commercial video applications. The large number of pixels creates extremely sharp and detailed images, especially when viewed on large screens. UHD adds more depth, texture, and realism to the experience and is used in home theater and immersive media.
8K Ultra HD
8K Ultra HD takes video resolution to the next level with 7680×4320 pixels - that's 16 times more pixels than Full HD and four times more than 4K UHD. It delivers incredibly lifelike detail and is suitable for giant screens or future-proof setups. However, 8K content is still limited, and it requires powerful hardware and very high internet speeds to handle. Currently, 8K is mostly used in advanced filming, professional editing, and high-end display technology.
Part 3. Using Scenarios of Video Resolution
SD (Standard Definition)
Scenario: You're watching a YouTube tutorial on an old mobile phone while riding on a bus with weak internet. Why SD? SD (480p) is perfect here because it loads fast and uses very little data. The quality isn't excellent, but it's enough for straightforward content where fine detail doesn't matter.
HD (High Definition)
Scenario: You're streaming a TV show on your smartphone while connected to decent Wi-Fi at a café. Why HD? HD (720p) offers a noticeable step up in clarity compared to SD. On smaller screens, it looks sharp without consuming too much data.
QHD (Quad HD)
Scenario: You're editing photos, gaming on a high-end monitor, or watching high-quality YouTube videos on a premium phone. Why QHD? Quad HD (1440p) delivers sharper visuals, more screen real estate for editing, and better gaming clarity. It strikes a good balance between resolution and performance.
UHD (Ultra HD / 4K)
Scenario: You're watching a blockbuster action movie on a 55" 4K smart TV in your living room. Why UHD? UHD (4K) provides stunning detail and vivid colors, making it perfect for large screens and cinematic viewing. Textures, shadows, and movement all look more realistic.
8K Ultra HD
Scenario: You're in a tech showroom viewing a giant 80" display showcasing a nature documentary, or you're a professional filmmaker editing ultra-high-resolution footage. Why 8K? 8K offers unmatched sharpness and realism, especially on huge screens. While it's still niche, it's ideal for high-end production, art installations, or futuristic home theaters.
Part 4. What Do "p" and "i" Mean in Resolution?
p = Progressive Scan
Example: 720p, 1080p
In progressive scan, each frame of video is displayed in full, with all horizontal lines shown in sequence. This means the entire image is drawn at once, resulting in smoother, more precise motion, especially for fast-moving scenes like sports or video games. Progressive scan is the standard for most modern displays, including HDTVs, monitors, and smartphones.
i = Interlaced Scan
Example: 1080i
In an interlaced scan, each frame is split into two fields: One field displays the odd-numbered lines, and the following field displays the even-numbered lines. These two fields are shown in rapid alternation, which saves bandwidth but can cause visible flicker or blurring during fast motion. Interlaced was common in older TV broadcasts but is less popular today due to its lower image quality compared to progressive scans. This type of scanning is commonly used on old TVs.
Part 5. How to Change Video Resolution for Better Enjoyment
Resizing videos can be a daunting task, but that is why we suggest that you use Tipard Video Converter Ultimate. It is a robust and simple-to-use application that is specifically intended to carry out a variety of video editing tasks, so it is a good option for video resizing. If you want to upscale low-res videos to HD or 4K for improved video quality or downscale big files to free up space or guarantee they will play smoothly on older equipment, Tipard has a one-size-fits-all solution.
With compatibility for different resolutions and formats such as SD, HD, Full HD, and even 4K video resolution, it is easy for users to modify output settings. Its inherent enhancement feature and speed of conversion also make it the darling of beginners and professionals alike who want to convert video quality without slowing down.
Step 1Install and Launch Application
The first thing to do is download the software by clicking the download button available below. Also, note that the application is available on Windows and Mac. Please install the application by opening the downloaded package and launching it after the installation.
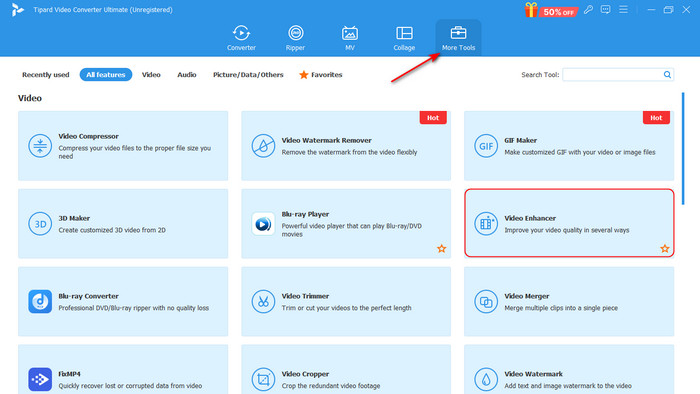
Step 2Launch Specific Tool
After launching the application, you will be able to see the top bar, which has lots of sections; click More Tools. Clicking the More Tools button will show the available features; select Video Enhancer.
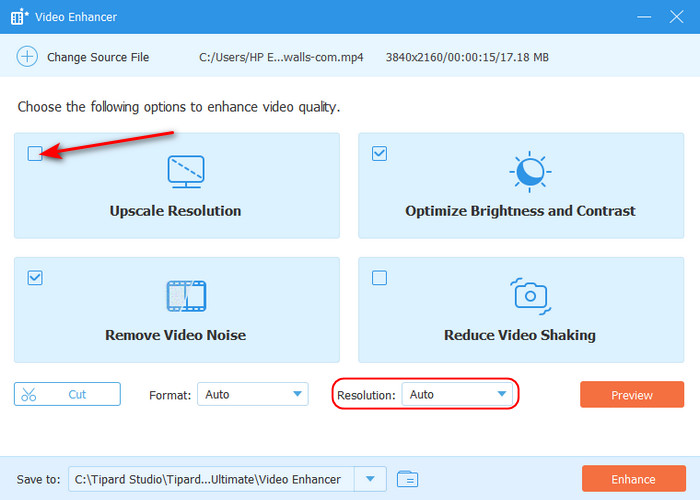
Step 3Import and Enhance Video
After selecting Video Enhancer, it will show a big + button, which will allow users to import the videos they want to enhance. After importing the videos, you will now be able to upscale, optimize, and remove video noise. Tick the check button of Upscale Resolution. Then, set the resolution of your desired quality by clicking the Resolution tab below.
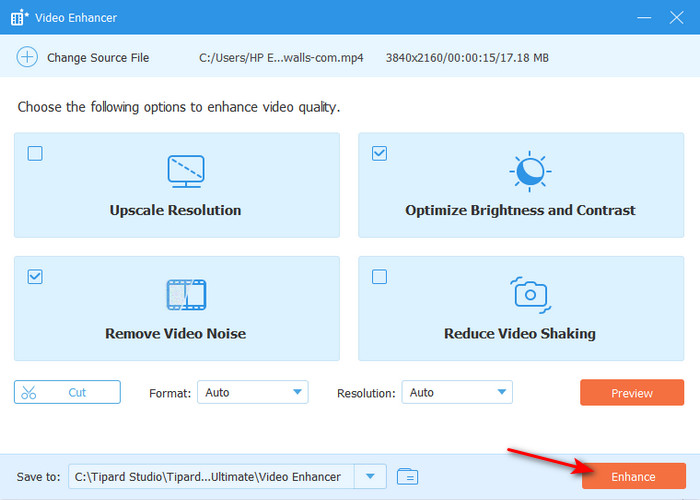
Step 4Export Video
After setting your desired resolution, you can now start exporting. Click the Enhance button to begin exporting your video. Your exported video will be saved in the local directory of your application.
Conclusion
Generally, knowledge about video quality levels enables you to make optimal decisions regarding streaming, recording, or editing in order to deliver the optimal view for all devices.
More Reading


About the Author