Copying a DVD to a Mac can protect it from being lost or damaged. Once the DVD is on your Mac, you can watch it anytime or transfer it to other Apple devices like iPhone, iPad, or Apple TV. It makes your movies more convenient to enjoy anywhere. In this guide, you will learn how to copy a DVD to a Mac quickly and easily.
Please take a closer look below to see how it works!

Part 1. Copy DVD to Mac – Main Output Formats
Copy DVD to Mac gives you options for how you want to save it.
- You can copy it as an ISO image. It keeps the full disc structure in one file.
- Another option is to copy it as VIDEO_TS and AUDIO_TS folders. It keeps all the DVD files organized like the original disc.
- You can also copy DVDs directly to video formats like MP4, MKV, or MPG. It makes it easy to watch your DVD movies on Mac, iPhone, iPad, or other devices without using the physical disc.
Each format has its own use, so you can choose what fits your needs best.
Part 2. How to Copy a DVD to a Mac Computer as an ISO or Folder
With Tipard DVD Cloner, you can easily copy a DVD to Mac as an ISO image or a DVD folder. Its three copy modes let you save the full movie, shrink to just the main movie, or customize which titles, audio tracks, and subtitles to keep, giving you flexibility and control. The process is simple and clear, making it perfect for first-time users.
- Works with DVD-9 and DVD-5.
- Make several copies at the same time.
- Preserve all audio tracks and subtitles.
- Unlock DVDs by removing region codes.
- Speed up DVD copying with adjustable write speed.

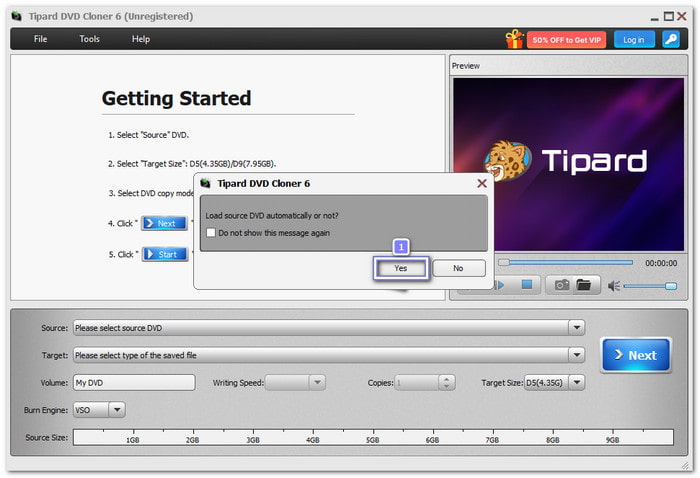
Step 1 To begin with, please get and set up Tipard DVD Cloner on your Mac computer. Then, insert the DVD you want to copy.
Step 2 Once you open Tipard DVD Cloner, a pop-up will appear asking if you want to load the source DVD automatically. Click Yes. It saves time and ensures the program detects your DVD without extra steps.
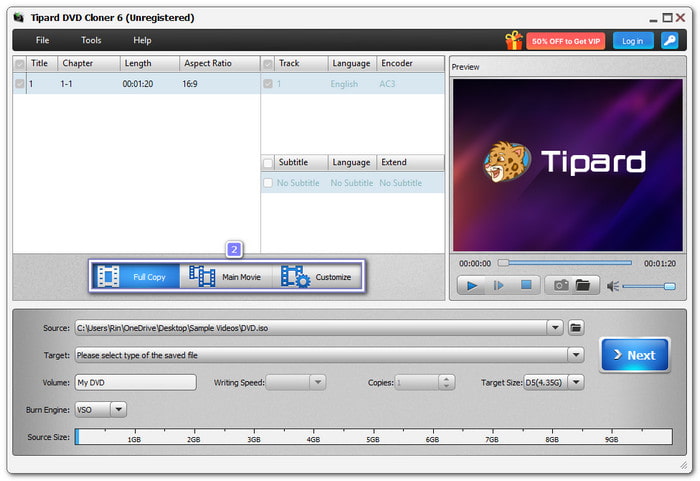
Step 3 After the DVD loads, select one from the copy modes you will see: Full Copy, Main Movie, and Customize.
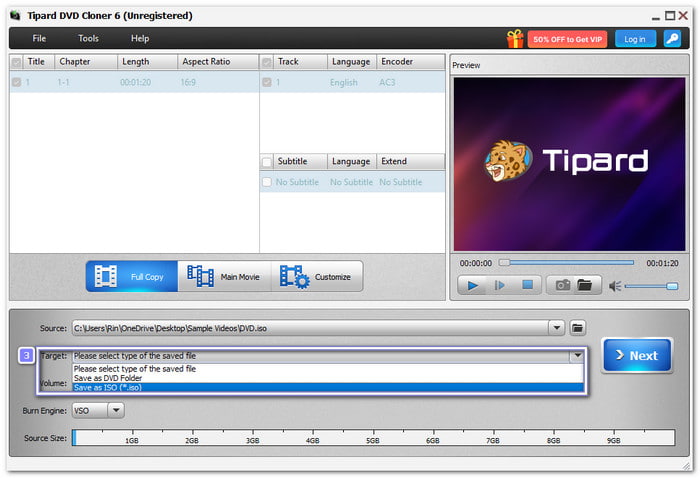
Step 4 Go to the Target drop-down menu and choose Save as DVD Folder or Save as ISO (*.iso).
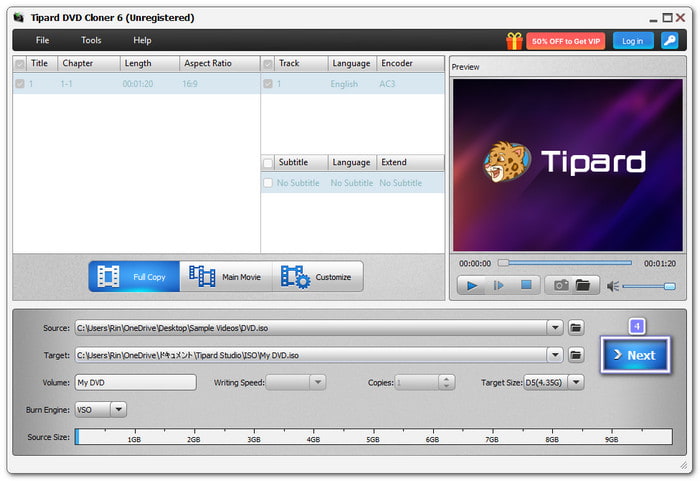
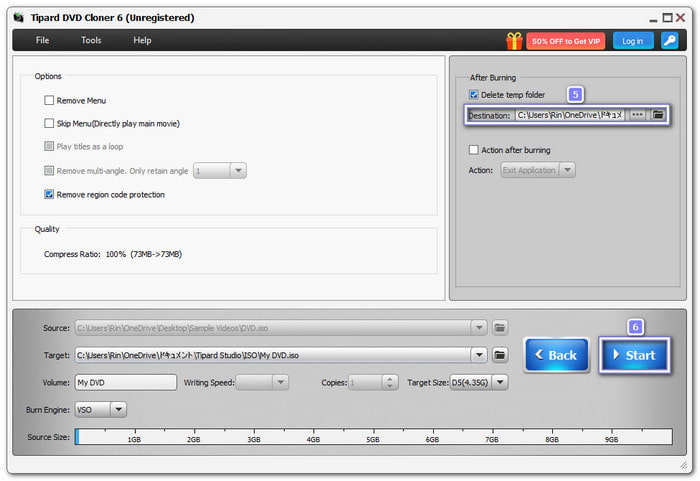
Step 5 Click the Next button to move to the next step. As you can see, the Remove region code protection option is already enabled by default. With that, you do not have to worry about restrictions.
Step 6 Head to the Destination and choose where on your Mac computer the DVD copy will be saved. Then, proceed to click the Start button.
Tipard DVD Cloner will begin copying your DVD, depending on your choice. Please wait for the process to finish, and then you can enjoy your DVD as a folder or ISO right on your Mac computer.
- Auto-detects DVD instantly.
- Preview DVDs before copying.
- Fast copying with a simple workflow.
- 1:1 cloning for DVD-9 and DVD-5 with all content.
- This DVD copier has a free version, but it comes with limits.
Part 3. How to Copy a DVD to a Mac Computer as a Video
You can also copy a DVD to your Mac computer as a video, and Tipard DVD Ripper makes it possible. It lets you rip DVDs to lossless MPG or MKV without losing quality. You can also convert DVDs to high-quality video formats using the HEVC or AV1 codec. It even allows you to upscale DVD movies to 1080p, 4K, and up to 8K.

- Convert DVD to 500+ formats.
- Ultra-fast 30× speed copies DVDs quickly with full quality.
- Rip DVDs to digital files with all audio, subtitles, and menus.
- Remove all DVD restrictions like region codes and protections.
- Edit DVDs by cutting, cropping, adding watermarks, or adjusting effects.

Step 1 Get Tipard DVD Ripper downloaded and installed on your Mac computer first. Then, please insert your DVD into the disc drive.
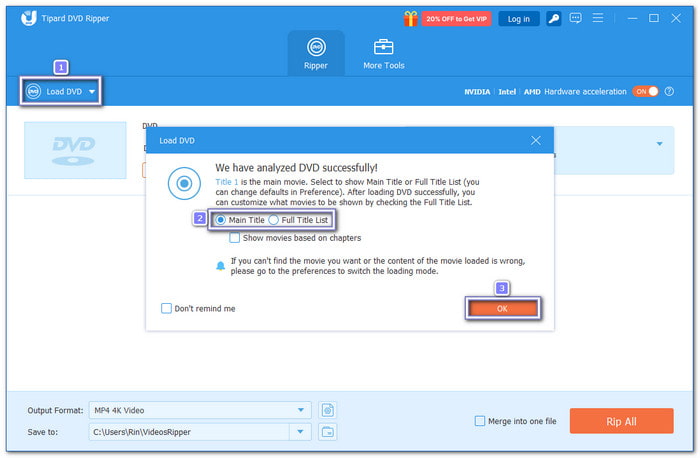
Step 2 Now, open Tipard DVD Ripper. Click Load DVD and choose your DVD. Next, select whether to load the Main Title or the Full Title List based on what you want to copy.
Step 3 After loading the DVD, open the Profile menu. Under the Video section, pick a format like MP4, MKV, or MPG. These formats work well on Mac devices and most media players.
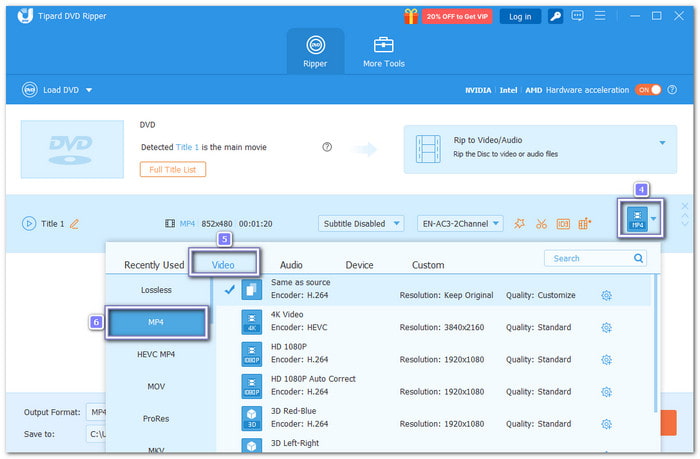
Step 4 If you want higher quality, click Custom Profile. Go to Resolution and choose 1920×1080 (1080p) or 3840×2160 (4K). You can also adjust other video and audio settings here.

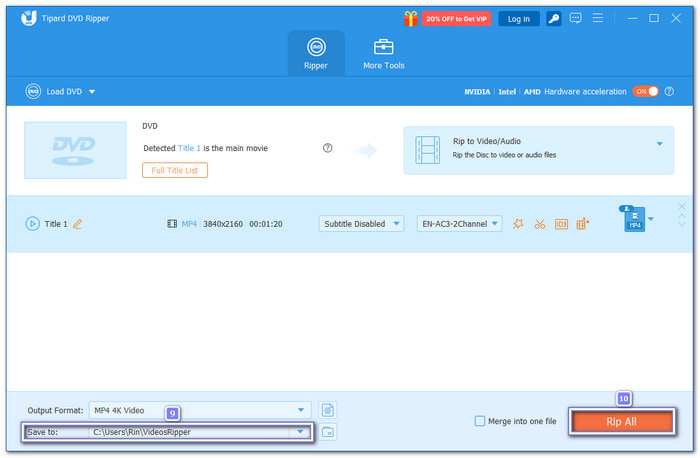
Step 5 Lastly, choose a folder in the Save To option. Once done, click Rip All. In just a short time, your DVD will be saved as a video on your Mac computer.
- Upscale 480p DVDs to 1080p, 4K, or higher.
- Rip any DVD, even 99-title discs, in high quality.
- Edit DVDs with cut, crop, watermark, and video effects.
- Convert DVD to 500+ formats and profiles.
- Full features require a paid subscription.
Part 4. FAQs of Copying DVD to Mac
1. Can DVDs be copied to a hard drive?
Yes, DVDs can be copied to your Mac's hard drive. You can save them as ISO files, DVD folders (VIDEO_TS and AUDIO_TS), or video formats like MP4 and MKV. It keeps your movies safe and easy to access without the physical disc.
2. How much does it cost to convert a DVD to digital?
It depends on the software. Some free DVD ripper for Macs offer free basic features, but full access usually requires a paid version. Prices vary, but a reliable tool like Tipard DVD Ripper is affordable and worth it for high-quality copies.
3. What is the best program to copy DVDs?
Tipard DVD Cloner and Tipard DVD Ripper are great DVD copy programs on Mac. They are fast, easy to use, and let you copy DVDs as ISO files, DVD folders, or video formats. You can keep all content, remove region codes, and even upscale your movies to 1080p, 4K, or 8K for better quality.
Conclusion
Good thing, there is DVD copy software for Mac OS that can help you do what you need. With Tipard DVD Cloner, you can copy DVDs as an ISO file or a DVD folder. With Tipard DVD Ripper, you can copy DVDs to digital formats like MP4 or MKV. There is no doubt that Tipard tools are really dependable when you need easy DVD solutions!
More Reading


About the Author