Key Takeaways
Use the built-in Switch functionality to record short clips or a capture card (plus Tipard Screen Capture or similar software) for long recordings.
- Recording methods: 30-second clips or unlimited recordings.
- Audio/video: System audio, mic, and webcam if desired.
- Output quality: Video export quality is AV1 or HEVC.
- Setup: Capture card and HDMI cables to a PC/Mac.
Once you want to save your best gaming moments, learning how to record on Nintendo Switch becomes essential. Whether capturing quick 30-second clips with the built-in button or long, high-quality sessions using a capture card and PC recorder like Tipard, this guide shows step-by-step how to record smooth, professional gameplay easily.
Part 1. Things to Prepare Before Recording Switch Gameplay
Recording gameplay on the Nintendo Switch requires a working setup. Having the right equipment paired with software will ensure there are no hiccups in the recordings, the video quality will be great, and the audio will be in sync.
The video tools needed will be:
1. Nintendo Switch and Dock: Needed to show the gameplay on an external display.
2. Capture Card: Sends the Switch gameplay to your PC to record.
3. PC or Laptop: Captures, watches, and stores the gameplay.
4. HDMI Cables: Join the Switch dock, capture card, and display.
5. Screen Recording Software: This will capture the gameplay on your computer.
6. Optional Accessories: Microphone, webcam, or headset for commentary and facecam.
Part 2. How to Record Switch Gameplay More Than 30 Seconds
In order to save Nintendo Switch gameplay longer than the built-in 30-second limit, the best option would be to use a screen recorder, like Tipard Screen Capture, in combination with a capture card. A capture card is necessary to move the video and audio from your Switch dock to your computer. This option allows you to record gameplay for as long as you want in high quality on both Windows and Mac, making it great for content creators.
Step 1 Connect the Nintendo Switch to the Capture Card
Put the Switch in the dock. Connect one end of your HDMI cable to the Switch, then the HDMI OUT side of the capture card, then the HDMI IN side to your TV or monitor. Finally, connect the card to your PC or Mac via USB.
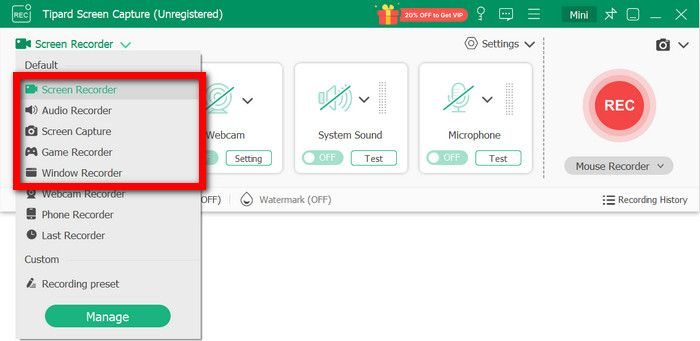
Step 2 Open Tipard Screen Capture
When you open Tipard, select Screen Recorder or Game Recorder. Make sure the display you want is the one from which you are capturing with your capture card, and then your gameplay should be in the preview.
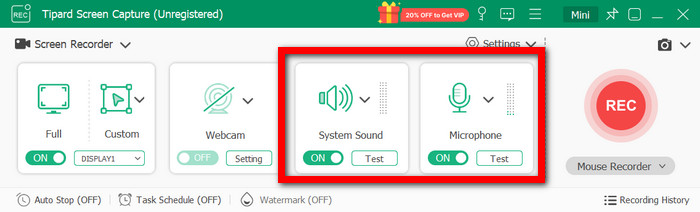
Step 3 Set Up Your Recording Preferences
Make sure System Sound is enabled, and toggle the Microphone so you can talk. You can also include a webcam if you want. Then, select the output format and codec you want for quality and compression (AV1 or HEVC).
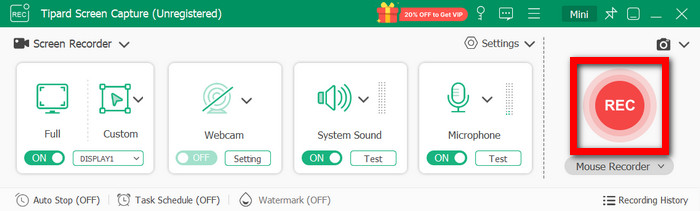
Step 4 Begin Recording Your Game
Press REC to begin your recording. Tipard Screen Capture has no time restrictions, so feel free to record as you play.
Step 5 Stop Recording and Save Your Video
Click Stop when you are done. You can edit, trim, or preview the video, then save it to your computer or share it online.
- Recording time is unlimited
- GPU acceleration provides smooth performance
- AV1 and HEVC codecs give high-quality outputs
- Requires additional hardware, such as a capture card
Why We Selected It
Tipard Screen Capture stood out due to its recording smoothness and high-quality output. With the help of GPU acceleration, lag and frame drops are minimized. High-quality videos are produced with AV1 and HEVC codecs. There are also useful recording management features like trimming, previewing, and online sharing. Plus, it has no time limits for recording, and you can include audio and your webcam.
Part 3. How to Record Switch Gameplay Without a Capture Card
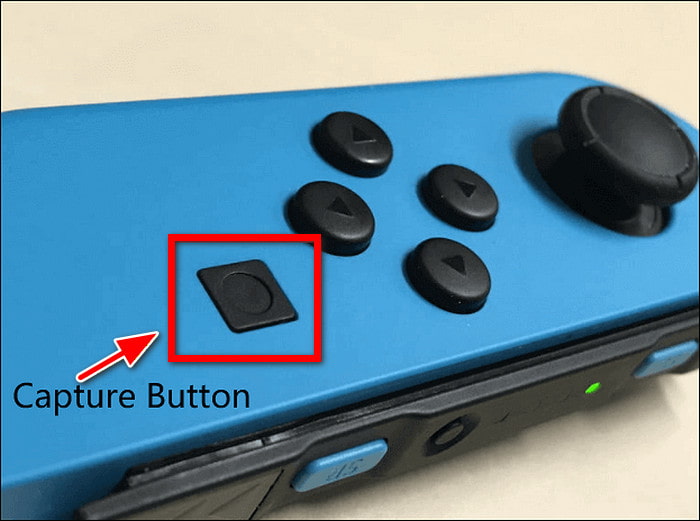
If you just want to record short clips, highlights, or special moments, the built-in capture button on your Nintendo Switch is good enough. This option is best for casual gamers, as it requires no additional software or hardware.
Step 1 Open the game you want to record.
Step 2 To initiate recording, press and hold the square Capture button located beneath the directional pad on the left Joy-Con. Note that you can only record clips that are 30 seconds or shorter.
Step 3 So to the HOME menu, tap Album, then go to All Screenshots and Videos to view your recordings. You also have the option to take your own screenshots from your saved clips by doing Editing and Posting > Save as Screenshot.
Part 4. Tips for Optimizing Switch Gameplay Recording
For the best results using either a capture card or the built-in recorder, consider the following tips:
1. Use a Reliable Capture Card: Capture cards like Elgato HD60 S or AVerMedia Live Gamer are smooth and lag-free, even with 1080p/60fps recordings.

2. Proper HDMI Connections: Connect the Switch dock to the capture card, and then to your monitor or TV. Using an HDMI cable of good quality will ensure signal drop-free play.
3. Switch to TV Mode: For capture card recording, always use TV Mode on your Switch to get the full video signal.
4. Adjust Resolution and Frame Rate: For fluid and clear gameplay recordings, make sure to set both your Switch and capture card to 1080p or 4K and 60fps.
5. Manage Audio Settings: For in-game sound, make sure system audio is on, and plug in a mic for commentary.
6. Organize and Preview Recordings: Use tips like recording history on Tipard Screen Capture, your built-in preview, or an online screen recorder to review, trim, and edit videos.
7. Remember Storage: Your PC or SD card should have enough available space so you can record long enough gameplay videos.
Part 5. FAQs of Recording Switch Gameplay
How do YouTubers record console gameplay?
For YouTubers to capture gameplay on consoles, they use capture cards, and second, they record their PC screens using Tipard Screen Capture to get high-quality recordings without limit, add game audio, and microphone commentary, and use webcam overlay if they want.
Can I record Switch gameplay on an iPhone?
No, the Nintendo Switch cannot output gameplay to an iPhone, so you cannot record gameplay on the Switch using an iPhone. Capturing gameplay on a PC using a capture card to record gameplay on PC and then transferring or streaming the recording to your iPhone is what you would have to do.
How do I replay a game on Switch?
You can play a game again on the Nintendo Switch by closing and then reopening the game. You can also watch captured videos by going to your screenshots and videos in the console album.
Conclusion
A Nintendo Switch screen recorder lets you capture gameplay effortlessly, whether using the built-in button for short clips or a capture card with Tipard Screen Capture for long, high-quality recordings. Follow these steps and tips to create smooth, professional videos every time.
More Reading


About the Author