Understanding how to record Skype calls helps you capture important conversations for work, study, or content creation. Recordings make it easy to review details, reuse discussions, and avoid misunderstandings. This article explains practical ways to record Skype calls on iPhone, Android, and desktop with dependable recording tools.

Part 1. Why You Need to Record Skype Calls
For both business and personal calls, recording Skype calls is exceptionally important and for very good reasons:
1. Capture Key Details: Recording calls ensures that important pieces of information can be recalled and nothing gets missed.
2. Stay Focused: Recording calls ensures that the attendee can be focused entirely on the topics being discussed and not have to divide their attention between taking notes.
3. Reuse Content: Making content from Skype calls and using that content to create video texts, audio using a podcast, or writing texts is always an option.
4. Avoid Misunderstandings: If there is a difference of opinion or a dispute on a call recording, remember that there is a recording of the Skype call that can clarify everything.
5. Keep a Reliable Record: Important calls can be stored with recordings and can be accessed later with consent from the call attendees.
Part 2. How to Record a Skype Call on an iPhone
Although the built-in recorder of Skype is limited to saving recordings made within the app (and sometimes even limits the quality), there is an option to use a screen recorder to capture anything on your screen, including video calls with audio. On your iPhone, TechSmith Capture is a great screen recorder that allows you to record videos on an iPhone with audio in high quality.
Step 1 Get TechSmith Capture from the App Store.
Step 2 Go to Settings, then Control Center, then tap Add next to Screen Recording to access it quickly.
Step 3 Make a video call on Skype.
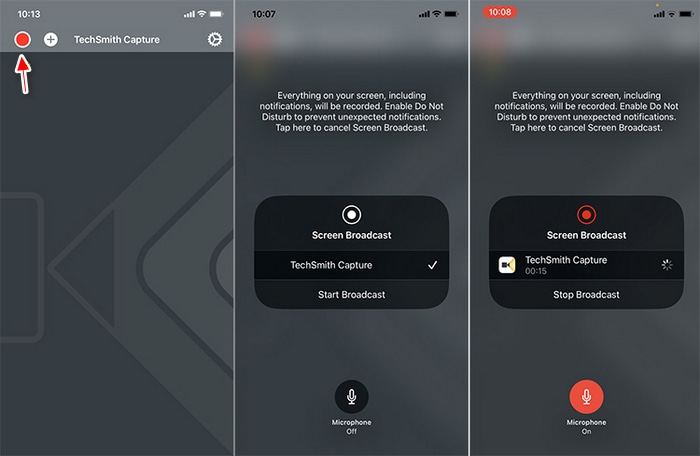
Step 4 Open the Control Center by swiping down (or up, depending on your phone), then press the Screen Record button.
Step 5 Choose TechSmith Capture from the list and tap Start Recording. Your iPhone will begin to record the screen and audio.
Step 6 After the call ends, press the red recording status bar at the top of the screen and choose Stop.
Step 7 Your video will be saved in both the TechSmith Capture app and your Photos. From there, you will be able to edit or share it.
Part 3. How to Record a Skype Call on Android
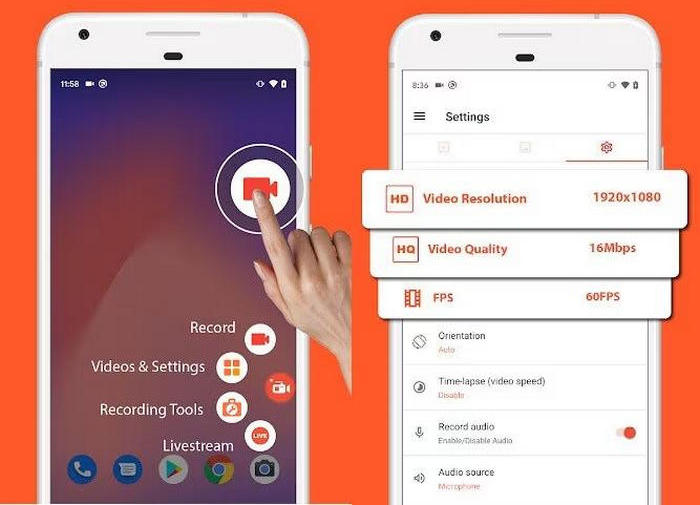
Since there are not a lot of apps that record Skype calls internally on Android, using a screen recorder is the best alternative, as it captures video calls on the screen. AZ Screen Recorder is a common option since it captures video and audio during the call and does not need root access.
Step 1 From the Google Play Store, download and install AZ Screen Recorder.
Step 2 Launch the app and accept the recording screen, microphone, and storage permissions.
Step 3 Start your video call on Skype.
Step 4 Press the floating AZ Screen Recorder button and tap the Record option.
Step 5 AZ Screen Recorder will now record your Skype Call, capturing the screen and audio of your Android device.
Step 6 After your call, swipe down the notifications and tap on the message that says Stop recording.
Step 7 AZ Screen Recorder has a gallery where your recording is saved. You can edit, watch, and share your recording from the gallery.
Part 4. How to Record Skype Video or Audio Call Easily
Using screen recorders on desktop devices to record audio or video calls on Skype is a lot easier, and the experience is much better because of the higher quality. Tipard Screen Capture works exceptionally well for Windows and Mac. It provides high audio and video quality and allows users to record without any lag and save the files locally to the device. It is ideal for podcast interviews, online meetings, tutorials, and personal calls where reliability and clarity matter.
- Supports long-duration recording without lag, even for extended Skype calls.
- Utilizes FLAC, AAC, and PCM audio codecs, along with HEVC and AV1 video codecs.
- Allows easy management of recordings with a built-in recording history.
- Records Skype video calls, audio calls, system sound, and microphone clearly.
- Saves recordings locally on Windows or Mac for easy playback and sharing.

Step 1 First, download the Tipard Screen Capture Tool from the Tipard official website, and install it on your Windows or Mac computer. After it has been successfully installed, run the application.
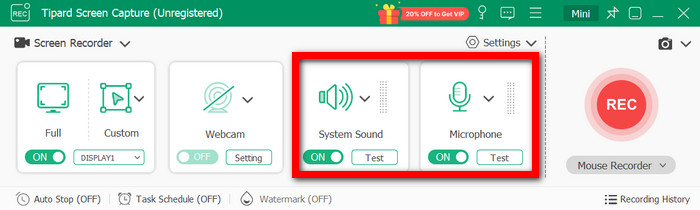
Step 2 In case you want to capture Skype video calls, choose the Screen Recorder mode. But, if you only want to record the audio of the calls, choose the Audio Recorder mode.

Step 3 You must choose if you want to record Full or Custom areas based on your preferences.

Step 4 Turn on the System Sound option if you want the audio from the Skype calls to be recorded, and do the same with the Microphone option if you want to record your own voice. Feel free to set the level balances if you want.
Step 5 Once you have set everything up, open your Skype application and begin the video or audio call you want to record.
Step 6 When you are ready, go back to Tipard Screen Capture and click the REC button. The application will now run in the background and record your Skype call, so you no longer have to worry about it.
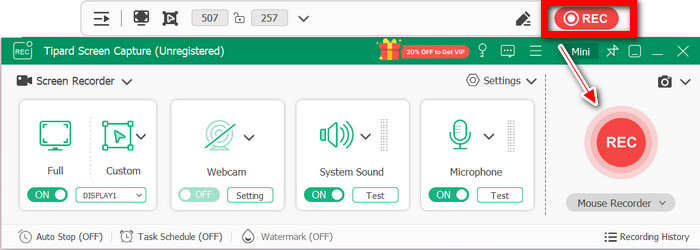
Step 7 Once the call is over, click on Stop. You can preview the recording and choose to edit it if you want. Then, save the recording to your computer in any format you want using the sound recorder.
Conclusion
A reliable Skype call recorder ensures you never miss important details during meetings, interviews, or personal conversations. Whether using an iPhone, Android, or a desktop, the right tools make recording simple, high-quality, and easy to manage. Choose the method that fits your needs and keep your calls safe, clear, and accessible.
More Reading


About the Author