Picture yourself attending an important Zoom conference, and one of your team members is absent: a pivotal player of your team who is crucial for the meeting, while important choices for the team are made in real time. In this case, understanding how to record Zoom meetings is important as you want to record the pertinent portions of the meeting. The instructions are structured for your every need, whether you are using a desktop, a mobile device, or even a method without host permission. Today, we also provide tips to record meetings of the best quality using tools like Tipard Screen Capture, which allows you to record meetings easily and record all your meetings without hassle.

Part 1. Can You Record a Zoom Meeting?
You can record a meeting on Zoom if you fulfill all the following conditions:
1. In your settings, recording is enabled: Local recording is activated (free plan), or cloud recording is activated (paid plan only).
2. In your settings, recording has been enabled: Local recording is switched on (free plan), or cloud recording is on (paid plan only).
3. You are on a supported device/app:
- Desktop app (Windows/Mac/Linux): local or cloud recording
- Web app: cloud recording only (paid plan)
- Mobile (iOS/Android) and Chromebook: cloud recording only (paid plan)
4. The admin policies or organization allow it: Recording is not turned off by your Zoom admin, and end-to-end encryption (E2EE) has not restricted cloud recording.
5. Available storage: There is adequate local recording space or a sufficient cloud recording space quota.
6. Recording consent: You are compliant with your local laws or company policy regarding recording.
Part 2. How to Record a Zoom Meeting
Recording Zoom meetings is possible on both desktops and mobile devices, provided you have sufficient permissions and recording is enabled in your account settings. The steps outlined below guide you on how to record on each platform.
A. How to Record a Zoom Meeting on Desktop
Step 1 Start the Zoom desktop app and sign in to your account.
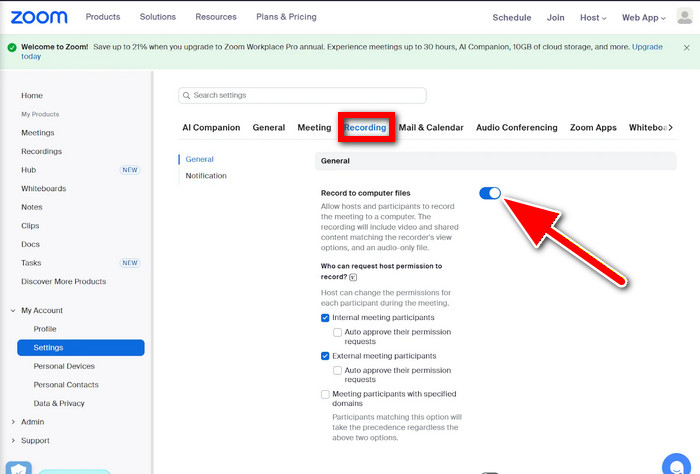
Step 2 Go to Settings, and click the Recording tab.
Step 3 If you are using a paid plan, enable Cloud recording. Otherwise, select Record to computer files for local recording.
Step 4 Begin a new meeting or join an existing one as a host or an authorized participant.
Step 5 On the bottom toolbar, click the button that says Record.
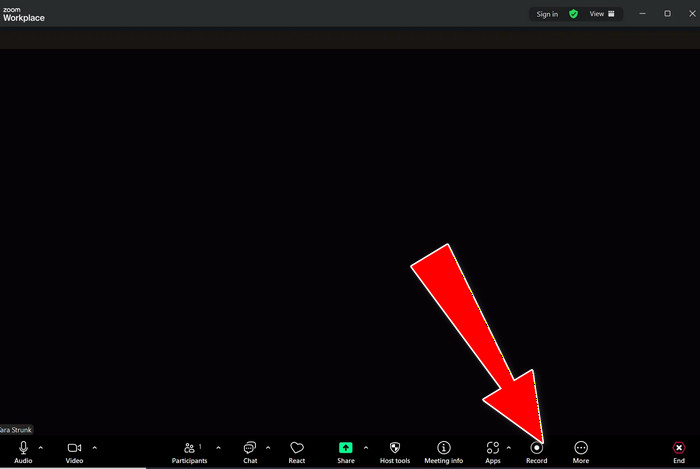
Step 6 Decide whether to record on this computer or to record to the cloud.
Step 7 During the meeting, you can use the Resume/Stop Recording button to help you.
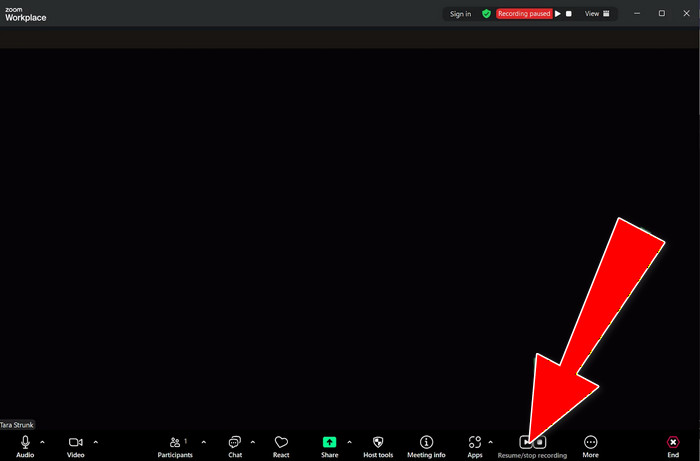
Step 8 To complete and save the recording, you must end the meeting.
B. How to Record a Zoom Meeting on Mobile (iOS / Android)
Mobile devices can only record to the cloud, which requires a paid plan for Zoom.
Step 1 On your Android or iPhone, open the Zoom app and sign in to your account.
Step 2 Begin a new meeting or join one as the host or co-host.
Step 3 Navigate to the meeting controls located at the bottom of your screen and click on the button that says More (three dots).
Step 4 Click the option that says Record to the Cloud. Cloud recording is an option that requires a paid plan to Zoom plan.
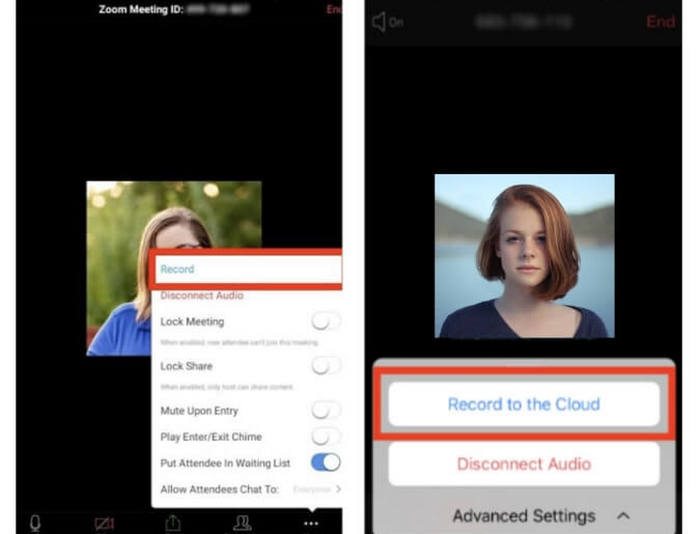
Step 5 Check for a recording button at the very top of your screen. This confirms that the recording is capturing both the audio and video.
Step 6 While in the meeting, click More again to either pause or stop the recording if you need to.
Step 7 Once the meeting is over and Zoom processes the recording, you can go to the Recordings section of the Zoom web portal to view, download or share the meeting you recorded.
Part 3. How to Record a Zoom Meeting Without Permission
Tipard Screen Capture is a multitalented screen, video and audio recorder for both professional and personal use. You can record your entire screen, a certain window, or a specific section while simultaneously recording your system audio and microphone voice. You can keep all your recordings stored directly on your computer, so you also have full access to your recordings.
- Record Zoom meetings discreetly using direct screen capture.
- Use AV1 and HEVC with GPU acceleration for high quality and smaller files.
- Record long sessions smoothly without lag or dropped frames.
- Capture system audio and microphone audio simultaneously.
- Save recordings locally in multiple formats and preview or edit instantly.

Step 1 Have the Software Ready
Visit the official Tipard website, download and install Tipard Screen Capture on your computer, whether it is Windows or Mac.
Step 2 Run the Recorder
Run Tipard Screen Capture and click on Screen Recorder on the main interface.
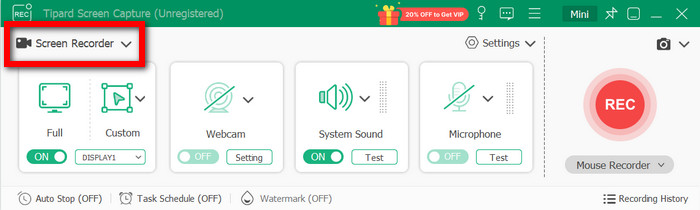
Step 3 Select the Desired Recording
Subsequently, pick a recording criterion from the options: Full or Custom area, to specify how you want to capture the Zoom meeting.
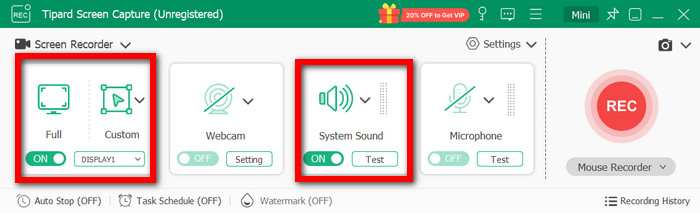
Step 4 Configure Audio Options
Then, enable System Sound capture so that you can record audio from Zoom and also enable the Microphone if you want to capture your speaking.
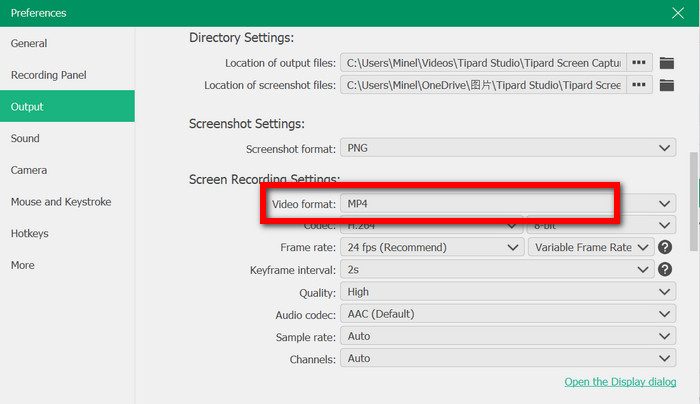
Step 5 Configure Recording Settings
To modify the output format, resolution, video codec (AV1 or HEVC), frame rate, and GPU acceleration, click the Settings option.
Step 6 Set up the Zoom Meeting
Now, join or start the Zoom meeting, and adjust the position of the Zoom window on your screen.
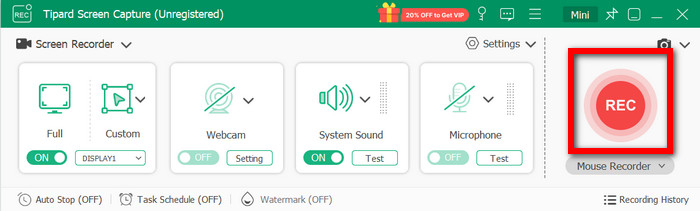
Step 7 Begin Recording
When you are ready, click the REC button to start your recording. It is possible to draw on the screen, show your keystrokes, and add comments to the recording.
Step 8 Finish and Store Recording
Once the meeting is over, click Stop. Please take a look at your recording and then save it to your device or share it with any of the supported platforms.
User Reviews
G2 Featured Review
Tipard Screen Capture, a reliable screen recorder for Mac, delivers excellent video and audio quality with minimal system impact. I regularly record long meetings and tutorials without lag or crashes, which is a huge plus.
Trustpilot Featured Review
It is straightforward to use and has a local save option, which is great. There is no recording time cap, even with lengthy recordings.
Part 4. FAQs of Record Zoom Meeting
Does a Zoom recording automatically save?
Yes, Zoom recordings save automatically once the meeting has ended. Local recordings are stored on your device, typically in a Zoom folder under Documents. Cloud recordings are stored and processed in your Zoom account, and once processed, you can stream, share, and download them.
What is the 40-minute rule for Zoom?
The 40-minute rule applies solely to free Zoom accounts. For group meetings with three or more participants, the meeting will end after 40 minutes. One-on-one meetings have no such limits. Once you upgrade to a paid account, you will have no time limits, longer meetings, and the ability to record to the cloud.
Why can't I download a Zoom recording?
You might not be able to download a Zoom recording if you have not been given access, the host has download permissions turned off, the recording is still in processing, or the admin has restricted cloud storage. In addition, if the webcam recording has expired or has been deleted, it cannot be downloaded.
Conclusion
Understanding whether you are recording a Zoom meeting helps you capture important conversations, training sessions, or team updates effortlessly. By using the built-in recording features of Zoom or tools like Tipard Screen Capture, you can create high-quality recordings with clear audio, save them securely, and access or share them whenever needed.
More Reading


About the Author