- Part 1. Comparison of Top 7 Ways to Record Webinars
- Part 2. How to Record a Webinar in High Video Quality
- Part 3. How to Record a Webinar with Snagit
- Part 4. How to Record a Webinar with Camtasia
- Part 5. How to Record a Webinar with Bandicam
- Part 6. How to Record a Webinar with OBS
- Part 7. How to Record a Webinar with ShareX
- Part 8. How to Record a Webinar with ScreenRec
Key Takeaways
Prior to beginning webinars, make sure to finish setting up the video, audio, and screen recording options.
- Recording Mode: Choose screen, window, or custom area recording.
- Audio: Record your voice and the system audio.
- Video: Select a recording quality. Choose AV1 or HEVC.
- File Management: You can edit, preview, and share your recordings.
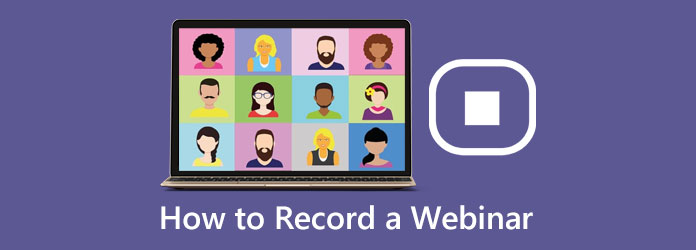
Whether you are attending a live session or hosting an online event, knowing how to record a webinar helps you revisit key points later. This article compares the top tools and explains simple methods to capture webinars in high quality on Windows and Mac.
- Part 1. Comparison of Top 7 Ways to Record Webinars
- Part 2. How to Record a Webinar in High Video Quality
- Part 3. How to Record a Webinar with Snagit
- Part 4. How to Record a Webinar with Camtasia
- Part 5. How to Record a Webinar with Bandicam
- Part 6. How to Record a Webinar with OBS
- Part 7. How to Record a Webinar with ShareX
- Part 8. How to Record a Webinar with ScreenRec
Part 1. Comparison of Top 7 Ways to Record Webinars
| Tool | Platform | Webcam Overlay | Record as Attendee | AV1 / HEVC Support | Easy Management & Sharing | Editing Features |
|---|---|---|---|---|---|---|
| Tipard Screen Capture | ✔ | ✔ | ✔ | ✔ | ✔ | ✔ |
| Snagit | ✔ | ✘ | ✘ | ✘ | ✔ | ✔ |
| Camtasia | ✔ | ✘ | ✘ | ✘ | ✔ | ✔ |
| Bandicam | ✔ | ✘ | ✘ | ✘ | ✔ | ✘ |
| OBS Studio | ✔ | ✘ | ✘ | ✘ | ✔ | ✘ |
| ShareX | ✘ | ✘ | ✘ | ✘ | ✔ | ✘ |
| ScreenRec | ✔ | ✘ | ✘ | ✘ | ✔ | ✘ |
| Show MoreShow Less | ||||||
Part 2. How to Record a Webinar in High Video Quality
With Tipard Screen Capture, you can obtain a high-quality and versatile screen recording service. This is perfect for recording webinars, as it can capture video and audio smoothly, and additionally, recordings are easy to manage and share.
Platform: Windows, Mac
Best For: Recording webinars without being noticed, recording high-quality tutorials/presentations, and external devices screen recording like iPhones or Androids.
- Including webcam overlay.
- Record webinars as attendees, without anyone knowing.
- Excellent quality AV1 and HEVC codec support.
- Well, manage your recordings and share them easily.

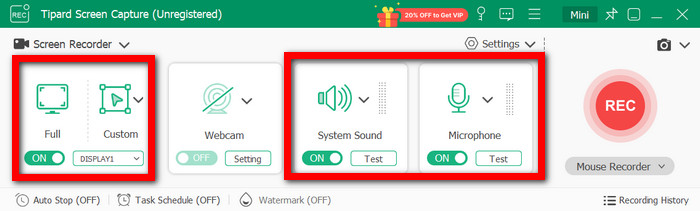
Step 1Download and set up Tipard Screen Capture. Launch it and open the webinar you want to record. You can choose your recording option (Full or Custom area) and turn on System Sound and the Microphone. You can also turn on the webcam overlay if you like.
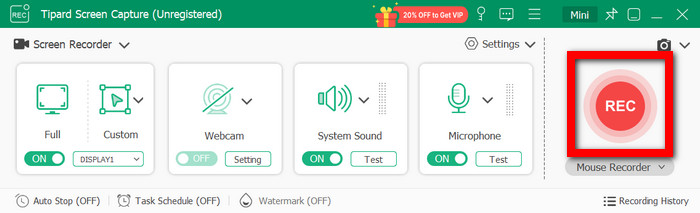
Step 2 Click the REC button to begin your recording. If you want, you can display the keystrokes that you are pressing or draw on the screen.
Step 3 When you are done, press Stop. You can save your recording, preview, trim, and merge your recordings. You can also share your recordings online.
- Seamless recordings using AV1 and HEVC codecs.
- Webcam overlay is an option.
- As an attendee, you can record covertly.
- Managing and sharing recordings is simple.
- Some advanced features are perhaps too much for a beginner to handle.
Why We Select Tipard:
Low-price, high-quality webinar recordings with webcam support, discreet attendee recording, and simple management and sharing features. AV1 and HEVC support ensure high-quality webinars with smaller file sizes, suitable for both professional and personal use.
Part 3. How to Record a Webinar with Snagit
Snagit is very simple to use for recording webinars, and it can record your screen, system audio and mic at the same time.

- Simple and intuitive.
- Built-in editor to trim, combine clips, and extract frames.
- Sharing is easy, and it integrates with Screencast and MP4.
- Lack of available more advanced features to edit in greater detail.
Instructions:
Install Snagit and download it from their website. Launch the webinar you want to record, then go to the Video tab and click the Capture button. Draw the area you want to record and turn on system audio and mic. Hit Record, then when your recording is done, stop the recording. Edit your video in the Snagit Editor, and after you are done editing, you can share your video as an MP4 file.
Part 4. How to Record a Webinar with Camtasia
Camtasia is a professional webinar recording software with even more advanced editing features such as adding captions, transitions and voice-overs.
- Flexible export choices.
- Multiple Video and audio source support.
- Advanced editing options.
- A learning curve with paid software.
- Resource-intensive.
Instructions:
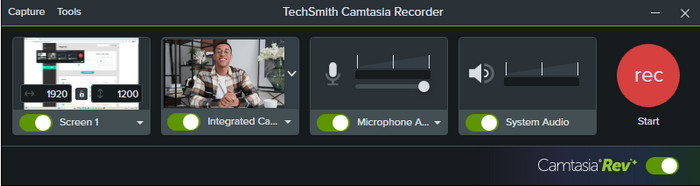
Install Camtasia and open it. Press New Recording. Choose your screen area and enable system audio and microphone. Press Record, run your webinar, and stop when done. Edit your recording in Camtasia Editor and export it as an MP4 or upload it to your chosen platform.
Part 5. How to Record a Webinar with Bandicam
Bandicam is a lightweight Windows recorder that is good for recording webinars, especially with the webcam overlay and real-time drawing functions.
- Small file sizes for high-quality video.
- Real-time annotations and webcam overlay.
- Quick and simple interface.
- Editing options are limited.
- The free version has a recording limit and a watermark.
Instructions:
Install Bandicam and open it. Choose the Screen Recording Mode, with full screen or custom screen recording, and enable audio. Press REC to start the recording. You can pause and resume when needed. When you are done, stop the recording, and the video will save automatically in MP4 or AVI.
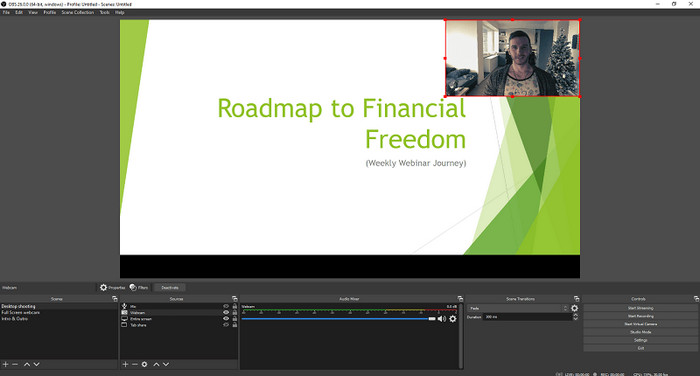
Part 6. How to Record a Webinar with OBS Studio
OBS Studio is a good free, open-source tool for recording and streaming webinars, especially for recording live sessions with multiple sources and overlays.
- A very flexible and customizable free tool.
- Multiple video and audio sources can be used.
- Live streaming options.
- It can be very complex for beginners.
- No editing options.
Instructions:
For OBS Studio, install it, choose Display Capture for your screen, Audio Input Capture for your microphone, and Audio Output Capture for your system audio. Choose your resolution and format, and hit Start Recording. Do your webinar, then hit Stop and Save.
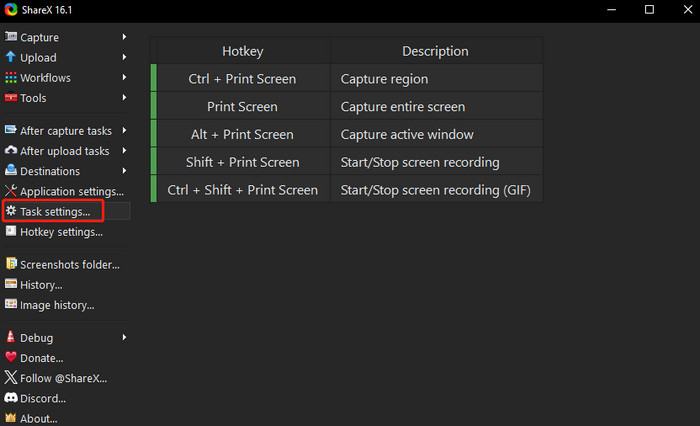
Part 7. How to Record a Webinar with ShareX
ShareX is a screen recorder you can download for free. It is also lightweight, making it perfect for quick webinar recordings.
- It is free and lightweight.
- It allows quick and easy screen recordings using video capture software.
- It has various options for sharing screen recordings.
- It has very limited editing capabilities.
- It is only available for Windows computers.
Instructions:
Install ShareX, then open it. From there, go to Capture > Screen Recording. Choose to record full screen or a customized region, and select to record system audio. Click Start to begin recording and Stop once the webinar is over. Your video will be saved automatically in an MP4 format.
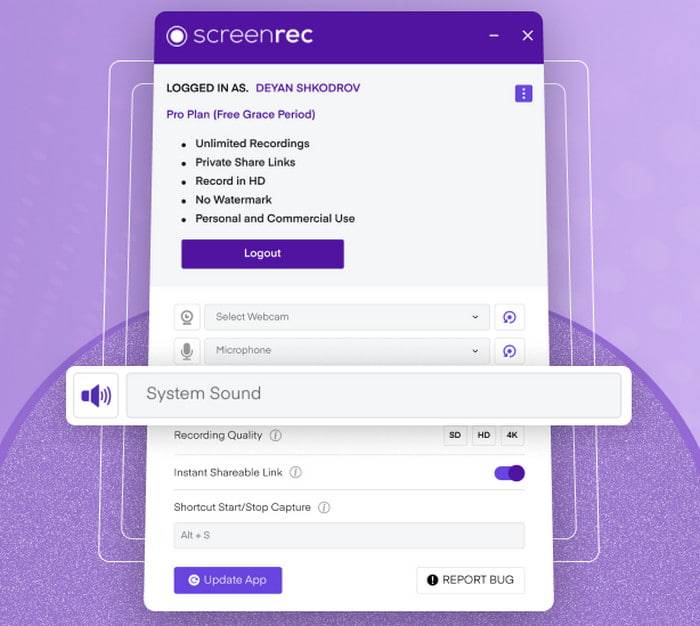
Part 8. How to Record a Webinar with ScreenRec
ScreenRec is a lightweight tool that lets you record webinars. It has a simple design that lets you record instantly and offers saving and link sharing.
- It lets you record instantly, and sharing is easy.
- It is lightweight and works across platforms.
- It offers automatic saving and link generation.
- It has limited editing options and also works as a sound recorder.
- In the free version, your storage is limited.
Instructions:
Install and launch ScreenRec. Choose full screen or a custom region, turn on system audio, turn on the microphone and hit Record. Start the webinar and click Stop once you are done. Your video will be saved locally, and a link will be automatically created.
Conclusion
Webinar recording is essential for preserving important discussions and learning materials. With the right tool, you can capture high-quality video easily, manage files efficiently, and revisit webinars anytime for training, sharing, or personal reference.
More Reading


About the Author