Are you a teacher making lessons, a gamer sharing your gameplay, or someone creating tutorials? If yes, then this guide is for you. In this article, you will learn how to record video on Mac & Windows, including how to add voiceover and webcam overlay. Keep reading to master simple ways to capture your screen.

Part 1. How to Record Video on Mac (Support Tahoe)
1. Using Default Shortcut
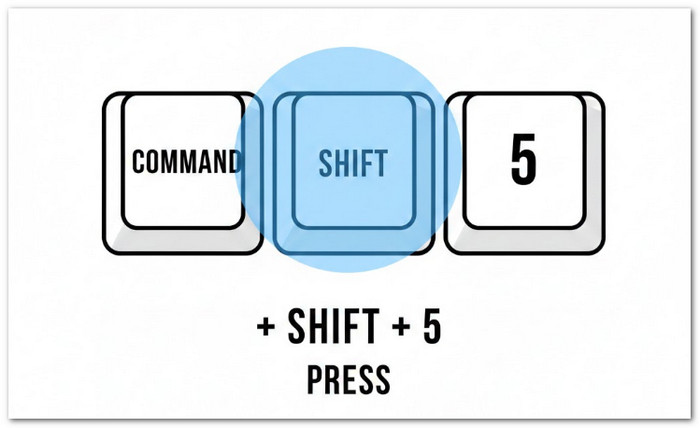
Your Mac has a hidden shortcut that opens a small recording panel in seconds, making it one of the simplest approaches to recording video on a Mac. With one key combo, you can capture the full screen or just a part of it. You can also turn on the microphone and set a timer.
Step 1 Press Command + Shift + 5 on your keyboard. Then, the screen recording toolbar will appear at the bottom of your screen.
Step 2 Choose Record Entire Screen or Record Selected Portion. If you pick a selected portion, drag the box to adjust the area.
Step 3 Click Options to choose a microphone if you want to record your voice. You can also set a timer if needed.
Step 4 Click Record to start. Once you are done, click the Stop button in the menu bar. Your video will save automatically to your desktop.
2. Using QuickTime Player
QuickTime Player is more than a video player. It also acts as a reliable desktop recorder that lets you record your screen in a clean and easy way, making it a popular choice for how to record video on Mac. You can choose audio input and review the clip before saving it.
Step 1 Open QuickTime Player from Applications or Spotlight search.
Step 2 Click File at the top menu. Then, choose New Screen Recording. The recording toolbar will show up.
Step 3 Click the small arrow or Options button to choose your microphone. After that, choose to record the full screen or just a part of it.
Step 4 Hit Record to begin. Once finished, click Stop in the menu bar. Then, click File > Save to choose where to store your video.

3. Using Single Window Recording in macOS 26
macOS 26 adds a smart feature that records only one app window, making it a handy option for how to record a video with a Mac. It keeps your desktop private and clean. You stay focused on one task without showing other apps. It is great for tutorials and work demos.
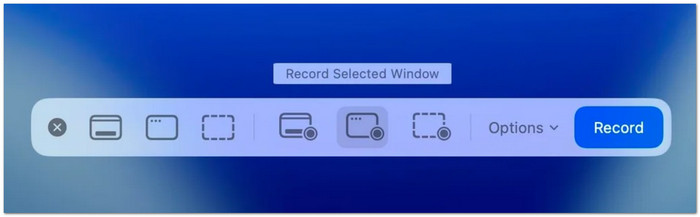
Step 1 Press Command + Shift + 5 to open the screen capture toolbar.
Step 2 Select the Record Selected Window option. Then, move your cursor over the window you want to record. It will highlight automatically.
Step 3 Click the highlighted window. After that, click Record to start. Only that window will be captured.
Step 4 Click the Stop button once you finish. The file will save to your default location.
Part 2. How to Record Screen Video on Windows
1. Using Snipping Tool
This tool is more than screenshots now. It lets you immediately record part of your screen with ease, making it a simple choice for how to record video on Windows 11. You can capture short tutorials, lessons, or clips in a few clicks.
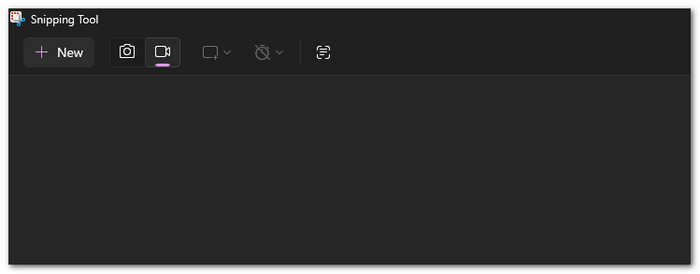
Step 1 Hit the Start button and search for Snipping Tool, and open it.
Step 2 Click the Record tab at the top. Then, click New to start setting up your recording area.
Step 3 Drag your mouse to choose the part of the screen you want to record. After that, click Start.
Step 4 When you finish, click Stop. Then, save the video to your computer.
2. Using Xbox Game Bar
Built right into Windows, the Xbox Game Bar is a powerful tool that makes it easy to learn how to record screen video on Windows. You can capture system audio, enable your microphone, and record gameplay or apps in real time. It works quietly in the background and saves your clips automatically, keeping your workflow smooth and hassle-free.
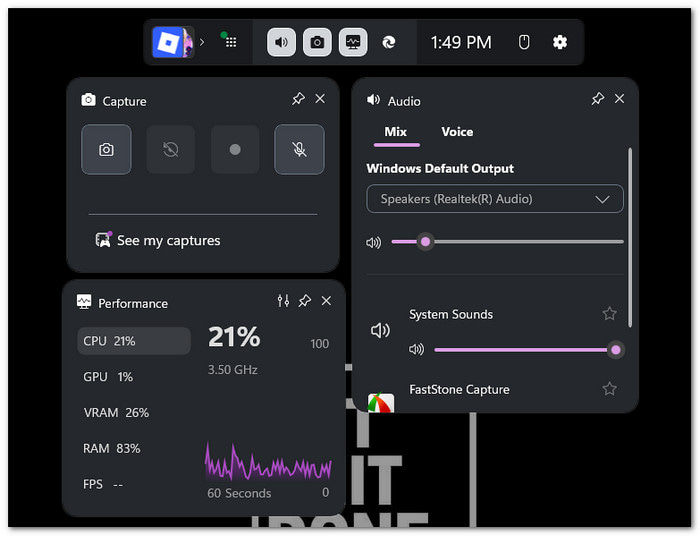
Step 1 Press Windows + G on your keyboard. The Game Bar overlay will appear.
Step 2 Look for the Capture widget. If you do not see it, click the Camera button to open it.
Step 3 Click the Record button to begin. You can also turn on the microphone if you want to record your voice.
Step 4 Click Stop when done. Your video will save automatically in the Videos > Captures folder.
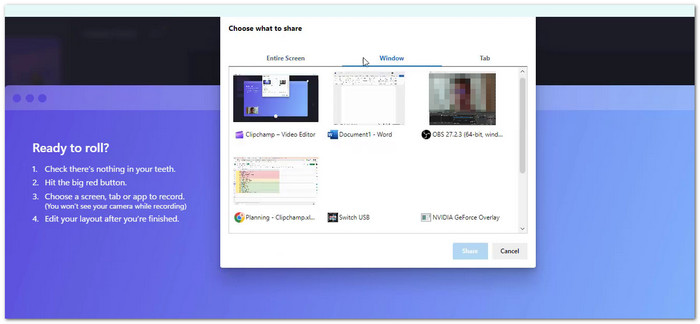
3. Using Clipchamp
Clipchamp is a Windows editor that makes it easy to record video on Windows 10 and 11. It can capture just your screen or screen plus camera. After recording, you can edit in the same app. It makes it perfect if you want both recording and simple editing without switching tools.
Step 1 Open Clipchamp from the Start menu. Then, sign in with your Microsoft account if asked.
Step 2 Click Create a new video. After that, choose the Record & Create option.
Step 3 Select Screen or Screen and Camera. Then, choose the tab or window you want to record and click Share.
Step 4 Click Stop sharing when finished. Your clip will appear in the timeline. Then, export it to save on your computer.
Part 3. Easily Record Video on PC and Mac with Voiceover and Webcam Overlay
Need to record videos with your voice and webcam overlay? Tipard Screen Capture is the one you are looking for. It runs on both Windows and Mac, letting you easily add webcam overlay and voiceover via your microphone.
You can record videos in original clarity, even in 4K, for sharp and clear results. It also supports HEVC and AV1 codecs for high-quality files with smaller sizes. It makes it perfect for creating tutorials, lessons, or any video that needs professional clarity and detail.
Let us not waste any more time; learn how to record a video on PC and Mac below:
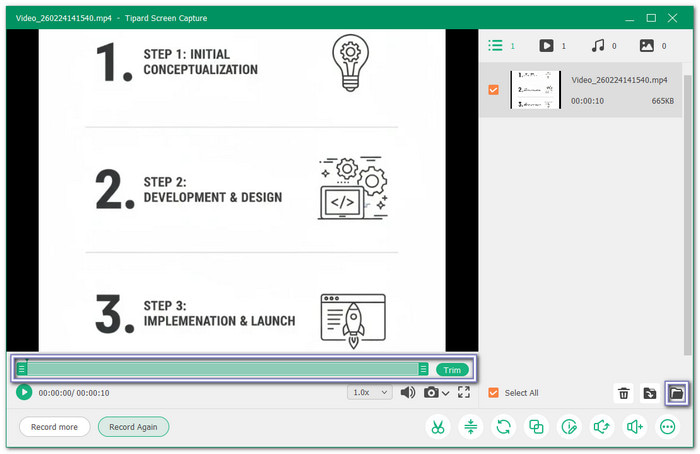
Step 1 First and foremost, download and install Tipard Screen Capture on your Windows or Mac. Choose the correct version for your system. After that, complete the setup and open the program.
Step 2 Once launched, select Screen Recorder. Then, choose to record the full screen or set a custom area. Next, turn on System Sound and Microphone to record the voiceover. You can also enable the Webcam to add a webcam overlay to your video.
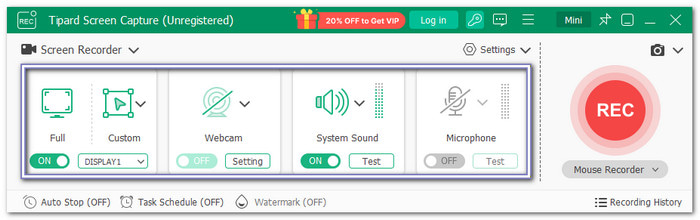
Step 3 After setting everything, click REC to start. While recording, you can take snapshots. You can also use annotation tools like text, arrows, lines, shapes, and highlights to mark important parts on the screen.

Step 4 Once finished, click the red Stop button. The video will open in the preview window. Here, you can trim unwanted parts. Finally, click the Folder button to check where your video is saved.
Part 4. Quick Comparison of the Screen Recording Methods
Recording your screen can be done in many ways on Mac and Windows. Each tool has its strengths, so it helps to see them side by side. Below is a quick comparison of the main screen recording methods. It will help you choose the right one for your task.
| Tools | Platforms | Record Full Screen | Record Selected Area | Webcam Overlay | Voiceover | Audio Options | Extra Features |
|---|---|---|---|---|---|---|---|
| Tipard Screen Capture | Windows & Mac |  |
|
|
|
System & Microphone | Snapshot, Annotation tools, trimmer, sound booster, compressor, etc. |
| Default Shortcut | Mac | |
|
 |
|
Microphone | Timer setting |
| QuickTime Player | Mac | |
|
|
|
Microphone | Preview recording and basic trimming. |
| Single Window Recording (macOS 26) | Mac | |
|
|
|
Microphone | Records a single app window. |
| Snipping Tool | Windows | |
|
|
|
Microphone | Built-in screenshot capture and light on resources. |
| Xbox Game Bar | Windows | |
|
|
|
System & Microphone | Capture games, show FPS, recording overlays, auto-save clips, and record background audio. |
| Clipchamp | Windows | |
|
|
|
System & Microphone | Record screen + camera, trim & split clips, add text & filters, and timeline editing. |
Conclusion
What Mac and PC video recording software do you think is perfect for your task? Is it Tipard Screen Capture, Clipchamp, or QuickTime Player? All of them are reliable, but they differ in what they offer. So, please remember to choose the one that gives everything you need for your screen video recording, from webcam overlay and voiceover to high-quality output.
More Reading


About the Author